Fit your Needs
Functional needs can be provided by core modules from OpenERP. You just have to decide which functionality you want in your system. As explained before, you can click the Check Box of the corresponding application. Another way of installing modules, is to go the Administration ‣ Modules ‣ Modules menu. Here you will find a list of all modules available in OpenERP. You can also check our website http://apps.openerp.com/ for more information about modules.
To manage your manufacturing, you do not need all the elements described in this book. But we find it very important to include an integrated flow, from first quotation to the payment of the supplier including all the steps: quotation, order, receiving goods, inventory, manufacturing.
To manage such a flow, we need at least the following applications:
- Manufacturing (the mrp module),
- Warehouse Management (the stock module),
- Accounting & Finance (the account module),
- Purchase Management (the purchase module),
- Sales Management (the sale module).
When you log on, OpenERP will display the opening screen with all selected business applications installed.
Database with all Required Functionality for this Example
You will create all the elements in the database that you need to carry out the use case. These are specified in the functional requirements.
Note
Examples
Of course, we will provide examples for you to configure your database, such as customers and suppliers. Make sure to use your own data instead.
Configuring Accounts
You need to start with a minimal set of accounts, and therefore you will need a couple of account types to determine the account’s use, how it will be transferred at year closing, and what category it belongs to. You can structure your accounts into a chart at any time (and, in fact, you can structure them into several additional charts at the same time as you will see in the on line chapter of the OpenERP book), so you do not need to be concerned unduly about structure.
Account Types
To create account types, go to Accounting ‣ Configuration ‣ Financial Accounting ‣ Accounts ‣ Account Types and click the New button. You will need the following six types, the first of which is shown in figure New Account Type. Click Save to confirm each account type.
| Acc. Type Name | Code | P&L / BS Category | Deferral Method |
|---|---|---|---|
| View | view | / | None |
| Income | income | Profit & Loss (Income Accounts) | None |
| Expense | expense | Profit & Loss (Expense Accounts) | None |
| Cash | cash | Balance Sheet (Assets Accounts) | Balance |
| Receivable | receiv | Balance Sheet (Assets Accounts) | Unreconciled |
| Payable | pay | Balance Sheet (Liability Accounts) | Unreconciled |
New Account Type
Accounts
To create accounts, go to Accounting ‣ Configuration ‣ Financial Accounting ‣ Accounts ‣ Accounts and click the New button.
You need accounts to keep track of your customers and suppliers, two more to sell and buy goods, and one for the payment and receipt of funds. And also one ‘organizing’ account that is just a view of the other five. So basically you will need at least the following six accounts, one of which is shown in New Account. Click Save to confirm each account.
Note
Chart of Accounts Structure
When you create a chart of accounts, you should always start with the main view account to define the chart, as shown in the table (Minimal Chart). This will allow you to easily link new accounts to the correct chart directly.
| Name | Code | Parent | Internal Type | Account Type | Reconcile |
|---|---|---|---|---|---|
| Minimal Chart | 0 | View | View | unchecked | |
| Payable | AP | 0 Minimal Chart | Payable | Payable | checked |
| Receivable | AR | 0 Minimal Chart | Receivable | Receivable | checked |
| Bank | B | 0 Minimal Chart | Liquidity | Cash | unchecked |
| Purchases | P | 0 Minimal Chart | Regular | Expense | unchecked |
| Sales | S | 0 Minimal Chart | Regular | Income | unchecked |
New Account
The Account Type entry is taken from the list of types that you just created. Although it looks a bit like a text box, it does not behave in quite the same way. A single Del or Backspace keystroke is all you need to delete the whole text, and when you type the name (or part of the name), you still need to associate that text with the entry by clicking the Tab or Enter key to confirm your selection. You can also use the Search icon to open a list of available account types.
Properties
You now define some default properties, so that you do not have to think about which account is used for a certain transaction every time you do something. The main new properties are the four that associate accounts payable and receivable to partners, and expenses and income to product categories.
Create properties using Administration ‣ Configuration ‣ Parameters ‣ Configuration Parameters and then clicking the New button. This menu is only available in Extended view.
Note
Selecting the correct field
When you have several fields with the same name, make sure to select the field for which the Field Name corresponds to the property name you are defining. Note that you can also duplicate properties and then change the required fields.
| Name | Field | Type | Value |
|---|---|---|---|
| property_account_payable | Account Payable | Many2One | (account.account) AP Payable |
| property_account_receivable | Account Receivable | Many2One | (account.account) AR Receivable |
| property_account_expense_categ | Expense Account | Many2One | (account.account) P Purchases |
| property_account_income_categ | Income Account | Many2One | (account.account) S Sales |
To check the result of your configuration, you can go to Accounting ‣ Customers ‣ Customers and open the form containing your company data. On the Accounting tab, you will notice that both the default account receivable and account payable have been filled.
Tip
Mistakes in configuring accounts and properties
It is easy to make mistakes in configuring accounts and their properties, but the consequences are not immediately obvious. You will mostly discover mistakes when trying to make a Purchase or Sales Order (see later, for example, Driving your Purchases), where the accounts are required fields or, if you are diligent, when you set up Partners.
If you configure them correctly at this stage, then fields will be completed automatically and you will never know a thing. If you do not configure all this correctly, then you will not be able to save the order form until you have corrected the problem or until you manually set the accounts.
Since this configuration is quite tedious, you would do best by finding a certified Chart of Accounts that has already been set up to meet your needs, and adapt the predefined chart if necessary.
Configuring Journals
You will also need to configure some journals, which are used to record the transactions from one account to another when invoices are raised and then paid. Create journals from the menu Accounting ‣ Configuration ‣ Financial Accounting ‣ Journals ‣ Journals and then click the New button.
Note
Default Values
Notice that when you select the journal type, the Display Mode will already be preset. An entry sequence for the journal will be created automatically when you save the journal. The default debit and credit account will be used as a counterpart when encoding manual journal entries. Debit and credit accounts are mandatory for bank journals.
| Journal Name | Code | Type | Display Mode | Default Debit Account | Default Credit Account |
|---|---|---|---|---|---|
| Purchase Journal | PUJ | Purchase | Sale/Purchase Journal View | P Purchases | P Purchases |
| Sales Journal | SAJ | Sale | Sale/Purchase Journal View | S Sales | S Sales |
| Bank Journal | BNK | Bank and Cheques | Bank/Cash Journal View | B Bank | B Bank |
In this example, validating a Purchase Order creates a draft invoice (see later, again for example, Driving your Purchases), where a journal is required.
As with accounts and properties, if you configure them correctly at this stage, the fields will be completed automatically and you will never know a thing. If you do not configure all this correctly, there will be errors with the order form or corresponding draft invoice, until you have corrected the problem or until you manually set the journal.
Configuring the Main Company
In case you had chosen to Skip Configuration Wizards when you first created the database, you may configure your company information in the following manner. Start configuring your database by typing your company’s name in the Main Company. When you print standard documents such as quotations, orders and invoices you will find this configuration information used in the document headers and footers.
To do this, click Sales ‣ Address Book ‣ Customers and click the name of the only company there, which is YourCompany . This gives you a read-only form view of the company, so make it editable by clicking the Edit button to the upper left of the form.
Tip
Editable Form in the Web Client
When toggling from the list view to the form view of an item, you can generally click its name in the list view to show a non-editable view, or the pencil icon by the left-hand edge of the line to open it in an editable view. You can toggle between editable and non-editable once you are in form view.
Change the contact name to match your first name and name. The company name and the contact name below are just an example.
- Name : Ambitious Plumbing Entreprises .
- Contact Name : George Turnbull .
Before you save this, look at the partner’s accounting setup by clicking the Accounting tab. The fields Account Receivable and Account Payable have account values that were taken from the account properties you just created. You do not have to accept those values: you can enter any suitable account you like at this stage, although OpenERP limits the selection to accounts that make accounting sense.
Back at the first tab, General, change any other fields you like, such as the address and phone numbers, then click Save. This changes one Contact for the Partner, which is sufficient for the example.
From the MAIN MENU, click Administration ‣ Companies ‣ Companies and edit the only entry there. Please note that you have to keep your own company data, but for the example we use the Ambitious Plumbing company.
- Company Name: AmbiPlum ,
- Partner: should already show Ambitious Plumbing Enterprises ,
- Report Header: Ambitious Plumbing ,
- Report Footer 1: type your slogan, i.e. Best Plumbing Services, Great Prices ,
- Report Footer 2: type your company details, such as bank account or Ambitious – our Registered Company Details .
Figure Changing Company Details shows the effect of this. You can also change various other company-wide parameters for reports and scheduling in the other tabs, and you can upload a company logo of a specific size for the reports. Click Save to store the changes.
Changing Company Details
You can leave the currency at its default setting of EUR for this example. Or you can change it in this Company and the two default Pricelists (Sales ‣ Configuration ‣ Pricelists ‣ Pricelists) if you did not set the correct company currency in the Configuration Wizard.
Note
Currency
The examples in this book are in USD and EUR. You, the reader, can use your home currency instead.
Creating Partner Categories, Partners and their Contacts
You will now create a supplier category and a customer category. Partner categories are useful for organizing groups of partners, but have no special behaviour that affects partners, so you can assign them as you like. Then you will define one supplier and one customer, with a contact for each.
To do this, go to the menu Sales ‣ Configuration ‣ Address Book ‣ Partner Categories and click New to open a new form for defining Partner Categories. Define the two categories that follow by just entering their Category Name and saving them:
- Suppliers ,
- Customers .
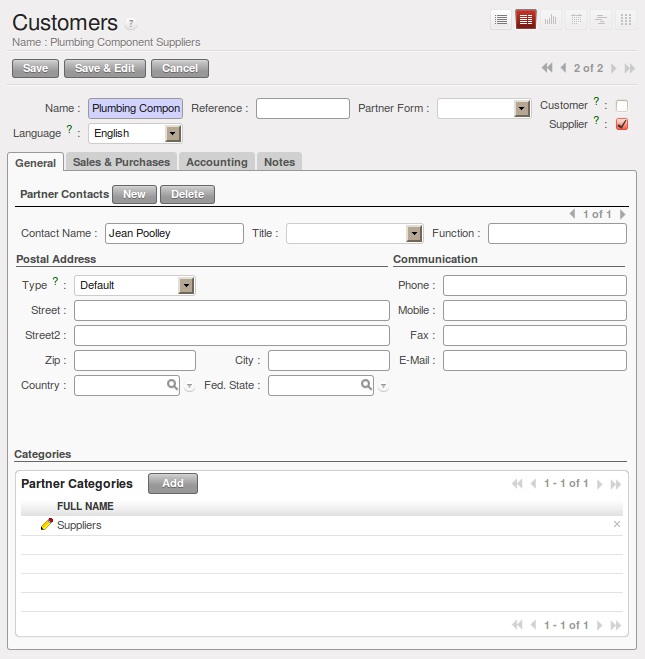
Then create two partners from the menu Sales ‣ Address Book ‣ Customers. OpenERP allows you to create both suppliers and customers from this menu. Please note that we provide some example data, but of course you should define your own customers and suppliers. Feel free to also complete the address, which we don’t do in our example. Click the New button to open a blank form and then add the following data for the first partner:
- Name : Plumbing Component Suppliers ,
- Customer checkbox : unchecked ,
- Supplier checkbox : checked ,
- Contact Name : Jean Poolley ,
- Address Type : Default ,
- click Add and select Suppliers to add the category to the Partner Categories field by selecting it from the Search Partner Categories list,
- then save the partner by clicking the Save button.
Figure New Partner Form shows the result.
New Partner Form
Note
Contact Types
If you have recorded several contacts for the same partner you can specify which contact is used for various documents by specifying the Address Type.
For example, the delivery address can differ from the invoice address for a partner. If the Address Types are correctly assigned, OpenERP can automatically select the appropriate address during the creation of the document – an invoice is addressed to the contact that has been assigned the Address Type of Invoice, otherwise to the Default address.
For the second partner, proceed just as you did for the first, with the following data:
- Name : Smith and Offspring,
- Customer checkbox : checked,
- Supplier checkbox : unchecked,
- Contact Name : Stephen Smith,
- Address Type : Default,
- add Customers in the Categories field,
- Save the form.
To check your work, you can go to the menu Sales ‣ Configuration ‣ Address Book ‣ Partner Categories and click on each category in turn to see the companies in the category.
Note
Multiple Partner Categories
If this partner was also a supplier, then you would add Suppliers to the categories as well, but there is no need to do so in this example. You can assign a partner to multiple categories at all levels of the hierarchy.
Creating Products and their Categories
Unlike partner categories and their assigned partners, product categories do have an effect on the products assigned to them – and a product may belong to only one category. Under the main menu link Warehouse or Sales, select the menu Configuration ‣ Product ‣ Products Categories and click New to get an empty form for defining a product category.
Enter Radiators in the Name field. Click Save. You will see that other fields, specifically those in the Accounting Properties section, have been automatically filled in with values of accounts and journals. These are the values that will affect products – equivalent fields in a product will take on these values if they, too, are blank when their form is saved.
Note
Property Fields
Properties have a rather unusual behaviour. They are defined by parameters in the menus in Administration ‣ Configuration ‣ Parameters ‣ Configuration Parameters, and they update fields only when a form is saved, and only when the fields are empty at the time the form is saved. You can manually override any of these properties as you need.
Property fields are used throughout the OpenERP system and extensively in a multi-company environment. There, property fields in a partner form can be populated with different values depending on the user’s company. For example, the payment conditions for a partner could differ depending on the company from which it is addressed.
Note
UOM
UOM is an abbreviation for Unit of Measure. OpenERP manages multiple units of measure for each product: you can buy in tons and sell in kgs, for example. The conversion between each category is made automatically (so long as you have set up the conversion rate in the product form first).
Tip
Managing Double Units of Measure
The whole management of stock can be carried out with double units of measure (UOM and UOS – for Unit of Sale). For example, an agro-food company can stock and sell ham by piece, but buy and value it by weight. There is no direct relationship between these two units, so a weighing operation has to be done.
This functionality is crucial in the agro-food industry, and can be equally important in fabrication, chemicals and many other industries.
Now create a new product through the Warehouse or Sales menu:
Go to Products ‣ Products and click New.
Create a product – type Titanium Alloy Radiator in the Name field.
The Product Type field should be assigned as Stockable Product. The fields Procurement Method, Supply method, Default Unit Of Measure, and Purchase Unit Of Measure should stay at their default values. For more information about these methods, please refer to chapter Procurement Methods – Make to Stock and Make to Order.
Enter 57.50 into the Cost Price field and 132.50 into the Sale Price field.
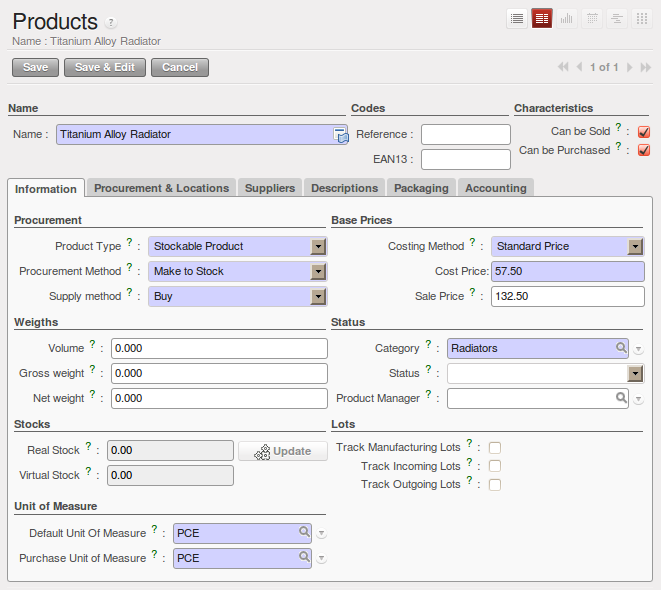
Product Form
Click the Search icon to the right of the Category field to select the Radiators category.
Click the Accounting tab, then click Save and observe that Accounting Properties here remain empty. When product transactions occur, the Income and Expense accounts that you have just defined in the Product Category are used by the Product unless an account is specified here, directly in the product, to override that.
Once the product is saved, it changes to a non-editable state. If you had entered data incorrectly or left a required field blank, an error message would pop-up, the form would have stayed editable and you would need to click from tab to tab to find a field colored red that would have to be correctly filled in.
Stock Locations
Click Warehouse ‣ Inventory Control ‣ Location Structure to see the hierarchy of stock locations. These locations have been defined by the minimal default data loaded when the database was created. You will use this default structure in this example.
OpenERP has three predefined top-level location types , Physical Locations and Partner Locations that act as their names suggest, and Virtual Locations that are used by OpenERP for its own purposes.
- From the Main Menu click Warehouse ‣ Configuration ‣ Warehouse Management ‣ Locations to reach a list view of the locations (not the tree view).
- Click the Clear button to display a complete list of all predefined locations.
- Click the name of a location, such as Physical Locations/Ambitious Plumbing Enterprises to open a descriptive form view. Each location has a Location Type and a Parent Location that defines the hierarchical structure. While you are here you might have to change the location’s name to Ambitious Plumbing Enterprises.
- From the Main Menu click Warehouse ‣ Configuration Warehouse Management ‣ Warehouses to view a list of warehouses. There is only the one at the moment, named after your company, or in the example Ambitious Plumbing Enterprises .
A Warehouse contains an input location, a stock location and an output location for sold products. You can associate a warehouse with a partner to give the warehouse an address. That does not have to be your own company (although it can be); you can easily specify another partner who may be holding stock on your behalf.
Note
Location Structure
Each warehouse is composed of three locations Location Input, Location Output, and Location Stock. Your available stock is given by the contents of the Location Stock and its child locations.
So the Location Input can be placed as a child of the Location Stock, which means that when Location Stock is interrogated for product quantities, it also takes into account the contents of the Location Input. Location Input could be used as a goods-in QC location. The Location Output must never be placed as a child of Location Stock, since items in Location Output, which can be considered to be packed ready for customer shipment, should not be thought of as available for sales elsewhere.
Setting up a Chart of Accounts
You can set up a chart of accounts during the creation of a database, but for this exercise you will start with the minimal chart that you created (just a handful of required accounts without hierarchy, tax or subtotals).
A number of account charts have been predefined for OpenERP, some of which meet the needs of national authorities (the number of those created for OpenERP is growing as various contributors create and freely publish them). You can take one of those without changing it if it is suitable, or you can take any chart as your starting point and design a complete chart of accounts to meet your exact needs, including accounts for inventory, asset depreciation, equity and taxation.
You can also run multiple charts of accounts in parallel – so you can put all of your transaction accounts into several charts, with different arrangements for taxation and depreciation, aggregated differently for various needs.
Before you can use any chart of accounts, you need to specify a Fiscal Year. This defines the different time periods available for accounting transactions.
Create a Fiscal Year manually from Accounting ‣ Configuration ‣ Financial Accounting ‣ Periods ‣ Fiscal Years.
- In the Fiscal Year field, type the name of the current fiscal year (e.g. 2011),
- In the Code field, type the code of the current fiscal year (e.g. 11 or 2011),
- In the Start Date field, type the starting date of your company’s fiscal year (e.g. 01/01/2011),
- In the End Date field, type the ending date of your company’s fiscal year (e.g. 12/31/2011),
- Click the Create Monthly Periods button, if you have monthly declarations or click the Create 3 Months Periods button for quarterly declarations,
- Usually you will also create an extra period 00 to post your opening balance and outstanding invoices. To do this, click the New button, then type 00/2011 as the Period Name, 00/2011 as the Code and the first day of your financial year as the Start of Period and the End of Period dates. Then check the Opening/Closing Period checkbox.
Click Accounting ‣ Charts ‣ Charts of Accounts to open a Chart of Accounts form where you define exactly what you want to see. Simply click Open Charts to accept the defaults and display a hierarchical structure of the accounts.
Make a Backup of the Database
If you know the super-administrator password, make a backup of your database using the procedure described below. Then restore it to a new database: testing .
As a super-administrator, you do not only have rights to create new databases, but also to:
- backup databases,
- delete databases,
- restore databases.
All of these operations can be carried out from the Databases button in the web client’s Login screen.
Tip
Backup (copy) a Database
To make a copy of a database, go to the web Login screen and click the Databases button. Then click the Backup button, select the database you want to copy and enter the super-administrator password. Click the Backup button to confirm that you want to copy the database.
Tip
Drop (delete) a Database
To delete a database, go to the web Login screen and click the Databases button. Then click the Drop button, select the database you want to delete and enter the super-administrator password. Click the Drop button to confirm that you want to delete the database.
Tip
Restore a Database
To restore a database, go to the web Login screen and click the Databases button. Then click the Restore button, click the Choose File button to select the database you want to restore. Give the database a name and enter the super-administrator password. Click the Restore button to confirm that you want to install a new copy of the selected database. To restore a database, you need to have an existing copy, of course.
Tip
Duplicating a Database
To duplicate a database, you can:
- make a backup file on your PC from this database.
- restore this database from the backup file on your PC, and give it a new name.
This can be a useful way of making a test database from a production database. You can try out the operation of a new configuration, new modules, or just the import of new data.
A system administrator can configure OpenERP to restrict access to some of these database functions so that your security is enhanced in normal production use.
This operation enables you to test the new configuration on testing so that you can be sure everything works as designed. Then if the tests are successful, you can make a new database from, perhaps called live or production, for your real work.
From here on, connect to this new testing database logged in as admin if you can. If you have to make corrections, do that on YourCompany and copy it to a new testing database to continue checking it.
Or you can just continue working with the YourCompany database to get through this chapter. You can recreate YourCompany quite quickly if something goes wrong and you cannot recover from it but, again, you would need to know your super-administrator password for that.