Keeping Track of Stock Movements
Goods Receipts
In OpenERP, you have the choice between three ways to receive goods from suppliers.
The first method is to manually enter the information in the incoming shipment. To receive the products through this method, you have to go to Incoming Shipments section in the Warehouse Management submenu, click New and then you enter the information about the receipt.

Manual Data Entry for Product Receipt
The second method is to receive products from a generated incoming shipment. To achieve the reception using this method, you have to go to Incoming Shipments section in the Warehouse Management submenu. You will find the list of waiting incoming shipments.
The third method is to receive products by waiting products without looking at the shipment document. You can validate the reception by products in Receive Products section in the :guilabel:` Product Moves` submenu. With this method, you will be able to receive one product, regardless of the document which is attached to this product.
Receipt of a Supplier Order by Purchase Order
If you use Purchase Orders in OpenERP, product receipts are automatically generated by the system when the purchase order is confirmed. You do not have to enter any date, just confirm that the quantities ordered match the quantities received.
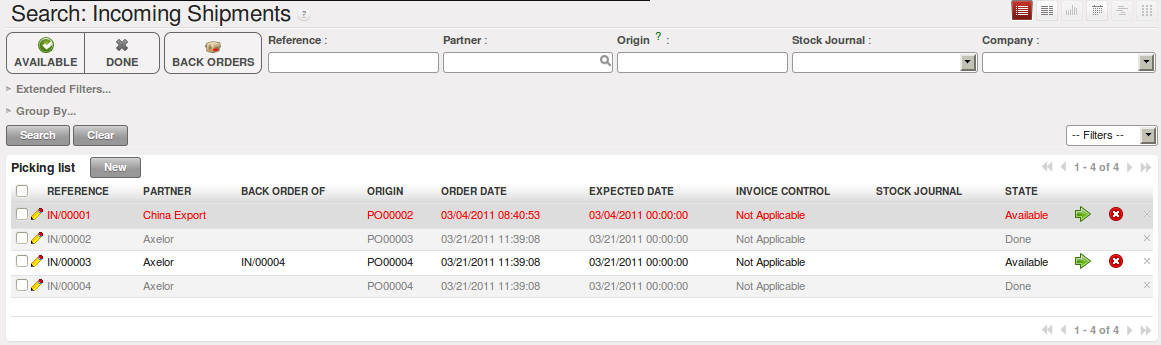
Incoming Shipments forms are automatically prepared by OpenERP from the purchase management process. You will find a list of all the awaited receipts in the menu Warehouse ‣ Warehouse Management ‣ Incoming Shipments. Use the order number or the supplier name to find the right goods receipt form for confirmation of a goods-in. This approach enables you to control quantities received by referring to the quantities ordered.

List of Items Waiting
You can also do goods-in data entry manually if there is no order, using the same menu by clicking the New button.
A new goods-in data entry form opens. Enter the supplier data in the Address field and type the reference number from your supplier in the field Origin. You should then enter data about the products received in the lines.
The source location is already completed by default because of your supplier selection. You should then give the destination location where you will place the products. For example, enter Stock. At this stage, you can set a lot number for traceability (this function will be described later in this chapter, so leave this field empty for the moment).
Once the form has been completed, you can confirm the receipt of all the products at the same time using the Process Now button. If you want to enter data for a goods receipt that you are still waiting for, click the button Process Later.
Note
Partial or Complete Reception
When you process the incoming shipment, you can choose between partial or complete.
If you have to validate a partial incoming shipment, click Process now and change the number of items according to the quantity received.
Confirm partial reception
Another object will be generated with a back order reference equal to the Reference number of the incoming shipment already confirmed.
Process a Partial Incoming Shipment
Once the rest of the order has arrived and has been processed, both orders will be merged.
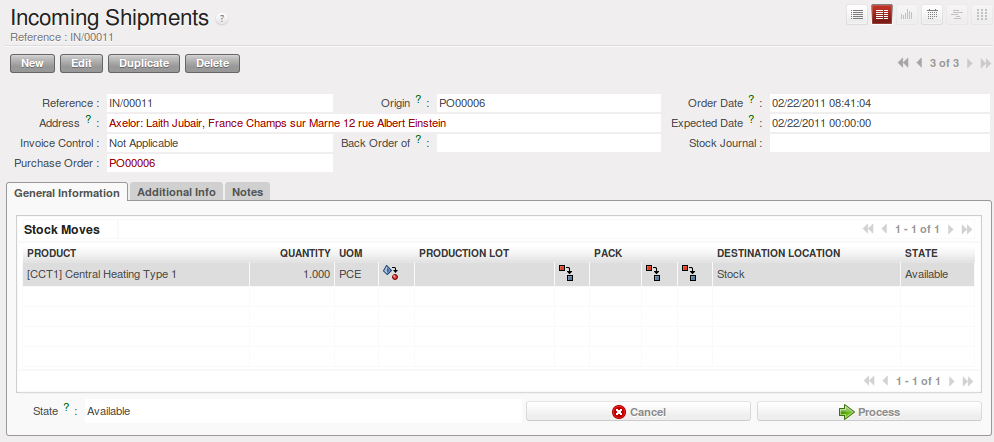
Form for Entering Goods received from a Supplier Order
The products then arrive in stock and should reflect the quantities shown on the product form.
In the Incoming Shipments form, the field Invoice Control lets you influence the way you send invoices to suppliers. If this is set to To be invoiced, a supplier invoice will now be generated automatically in the draft state, based on the goods received. Your accountant then has to confirm this pre-invoicing once the supplier’s invoice is received. This enables you to verify that the invoiced quantities correspond to the quantities received.
Tip
Print the Packing List
In order to print the packing list of an incoming shipment, select the incoming shipment of which you need the details and click Packing List in the panel at the right side of the screen.
This link is available in the Internal Moves and Delivery Orders sections.
In case you received damaged or wrong products, you can return them to the supplier. In the Incoming shipment form, click the Return Products button. A window will open that lets you choose the invoicing process to follow. Once you click Process, a stock move is generated with the same reference number and return to specify that this is a return move.
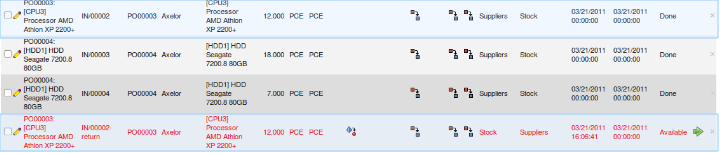
Stock Move for Returned Products
Receipt of a Supplier Order by Product
The approach shown above is very useful if goods receipts correspond to the original orders. If your suppliers deliver items that do not necessarily coincide with the orders, however, it is easier to work by products received rather than by orders.
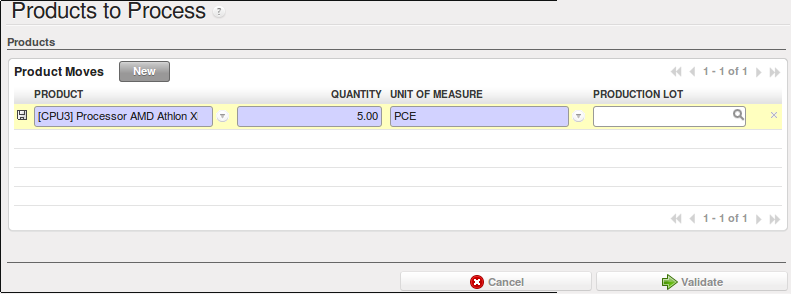
From this version on, you can also handle receptions by product, even from List view. Go to Warehouse ‣ Products Moves ‣ Receive Products.
Filters allow you to easily select receipts to be done, and so on. One way to quickly receive products is to Group by Supplier and select To Do.
This is very useful functionality when your supplier sends the goods for several purchase orders at a time. You can now just receive the products, regardless of the purchase order they come from, simply by clicking the green arrow at the right side of the screen.
The List view offers great flexibility and allows you to rapidly receive products by keeping full functionality! Of course, you can handle both partial and complete receptions, and you can add information about the production lots and packs.
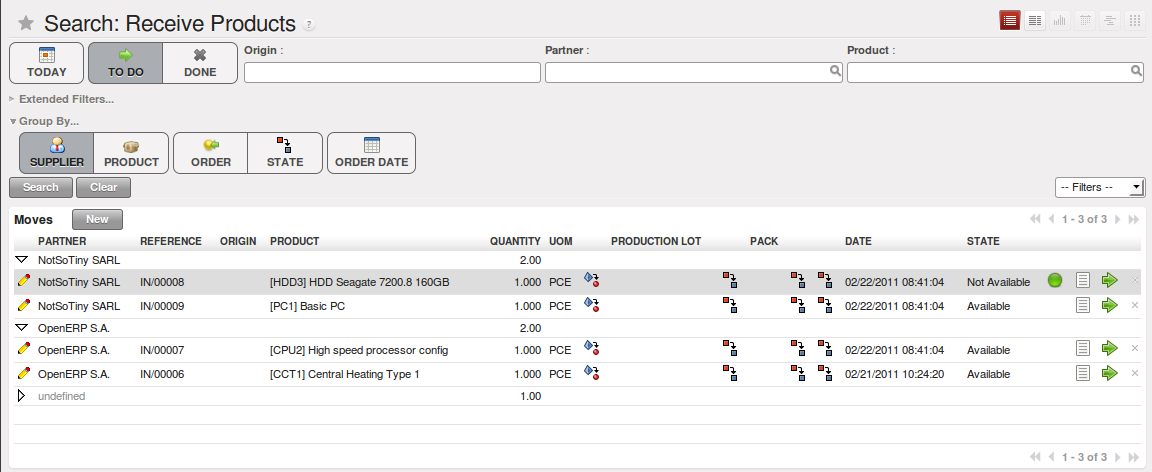
Receipt of a Supplier Order using Group By
This can be also accomplished from Form view.
Internal Stock Moves
You should install the stock_location module (from the list of modules, or through Reconfigure wizard, Advanced Routes) if routing products to customers, from suppliers or in your warehouse is determined by the identity of the product itself.
Managing the Paths from one Location to Another in a Product Form
This will let you configure logistics rules individually for each product. For example, when a specific product arrives in stores, it can automatically be sent to quality control. In this case, it has to be configured as a Push Flow with rules in the Product form. The fields that make up those rules are:
- Source Location: the rule only applies if a product comes from this location,
- Destination Location: the rule only applies if a product ends up in this location,
- Automatic Move: Automatic Move, Manual Operation, Automatic No Step Added,
- Delay (days),
- Operation: a free text field which will be included in the automatic stock move proposed by OpenERP.
There are two main logistic flows:
- Pushed Flows
- Pulled Flows
Push flows are useful when the arrival of certain products in a given location should always be followed by a corresponding move to another location, optionally after a certain delay. The original Warehouse application already supports such Push flow specifications on the Locations themselves, but these cannot be refined per product. Pull flows are a bit different from Push flows, in the sense that they are not related to the processing of product moves, but rather to the processing of procurement orders. What is being pulled is a need, not directly products. You will now see some examples of using these locations and logistics by product through Pushed Flows for:
- A rentable product,
- A product bought in China, following its freight by ship from port to port,
- A product that you want to send to quality control before putting it in stocks.
We will develop the third scenario: the quality control.
You can configure the system to put a given product in the Quality Control bay automatically when it arrives in your company. To do that, you just configure a rule for the product to be placed in the Quality Control location rather than the Input location when the product is received from the supplier.
| Field | Value |
|---|---|
| Source location | Stock |
| Destination location | Quality Control |
| Automatic Move | Manual Operation |
| Shipping Type | Getting Goods |
| Delay (days) | 0 |
| Operation | Quality Control |
Once this product has been received, OpenERP will automatically manage the request for an internal movement to send it to the Quality Control location. If you want to do this automatically without having to confirm it, in the Automatic Move field, select Automatic Move or Automatic No Step Added.
With the configuration described in the table above, you will have to confirm the stock move manually once you have received the goods.
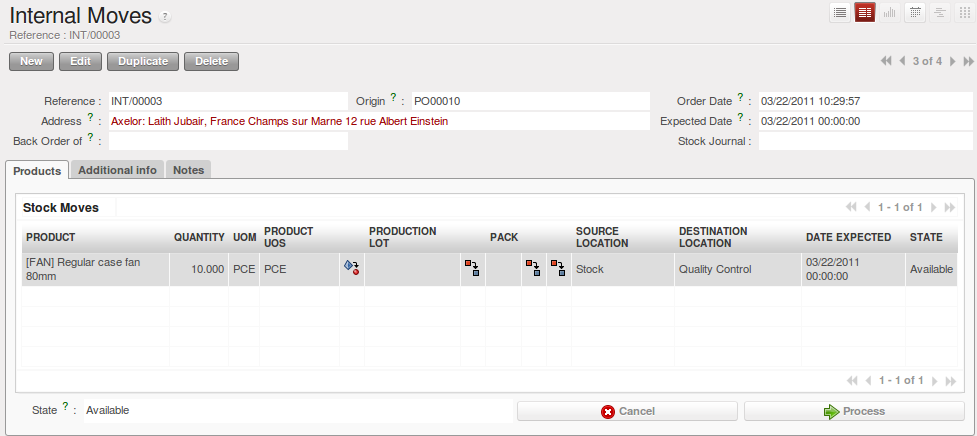
Manual Stock Move to Quality Control
If you do not want to confirm the stock move manually, but you want to see the move Suppliers –> Stock then Stock –> Quality Control, change the Automatic Move field and select Automatic Move. With this configuration, you will see the two stock moves.

Automatic Stock Move to Quality Control
If you select Automatic Move No Step Added, you will only see one stock move: Suppliers –> Quality Control

Automatic Stock Move to Quality Control (No Step Added)
Shipping of Goods
In the same way as delivering goods, you can ship goods in three different ways:
- manually enter data,
- deliver goods according to a sales order,
- deliver goods by product.
Everything about goods receipt can also be done manually in the same way for a customer delivery. This time, use the automated product delivery processes based on customer orders. Install the sale module (Reconfigure wizard, Sales Management), so that you can proceed further in this section of the chapter.
Now create a new sales order from the menu Sales ‣ Sales ‣ Sales Orders. Enter the following data in this order:
- Shop : OpenERP S.A.
- Customer : Agrolait
- Sales order lines :
- Product : [PC2] Basic+ PC (assembly on order),
- Quantity (UoM) : 3,
- Product UoM : PCE,
- Procurement Method : from stock.
You have already seen that OpenERP shows the available product stock in list view. The real stock is equal to the virtual stock because you have nothing to deliver to customers and you are not waiting for any of these products to be received into stock. The salesperson then has all the information needed to take orders efficiently.

Entering an Order for Three Computers
Then confirm the quotation to convert it to an order. If you return to the product form, you will see the virtual stock is now smaller than the real stock.
Start the scheduler through the menu Warehouse ‣ Schedulers ‣ Compute Schedulers. Its functionality will be detailed in ch-mnf. This manages the reservation of products and places orders based on the dates promised to customers, and the various internal lead times and priorities. Three products will be reserved in the order that you created, so they cannot be sold to another customer.
Tip
Just in Time
Install the module mrp_jit to schedule each order in real time after it has been confirmed. This means that you do not have to start the scheduler or wait for its periodical start time.
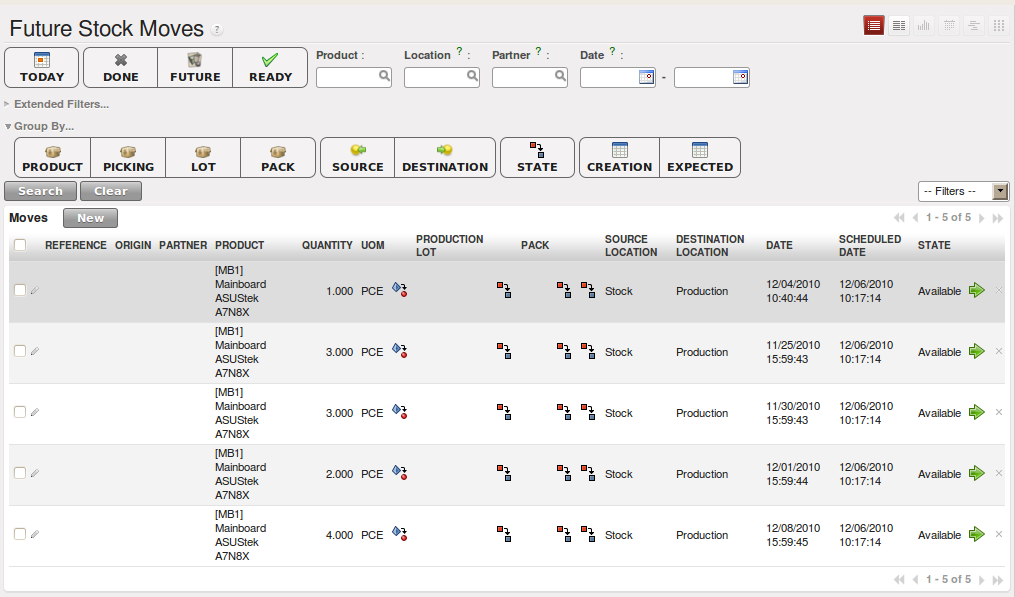
Now have a look at the list of deliveries waiting to be carried out using the menu Warehouse ‣ Warehouse Management ‣ Delivery Orders. You find a line there for your order representing the items to be sent. Double-click the line to see the detail of the items proposed by OpenERP.
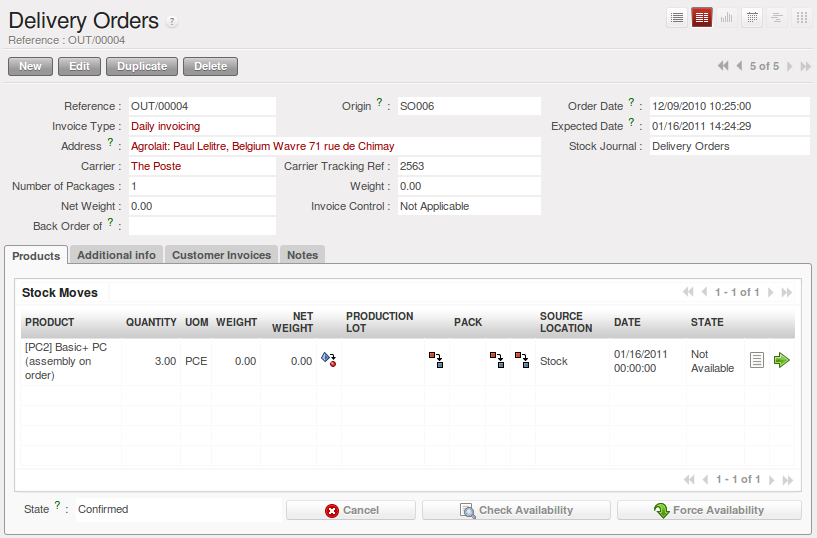
Items on a Customer Order
Tip
States
OpenERP distinguishes between the states Confirmed and Assigned.
An item is Confirmed when it is needed, but the available stock may be insufficient. An item is Assigned when it is available in stock and the storesperson reserves it: the necessary products have been reserved for this specific operation.
You can also confirm a customer delivery from a confirmed Sales Order. When you click the Process button of Outgoing Deliveries, a window opens where you can enter the quantities actually delivered. If you enter a value less than the forecasted one, OpenERP automatically generates a partial delivery note and a new order for the remaining items. For this exercise, just confirm all the products.
However, if you want to look at a partial shipping, an example will be developed at the end of this section.
If you return to the list of current orders, you will see that your order has now been marked as delivered (Done). A progress indicator from 0% to 100% is shown by each order so that the salesperson can follow the progress of his orders at a glance.
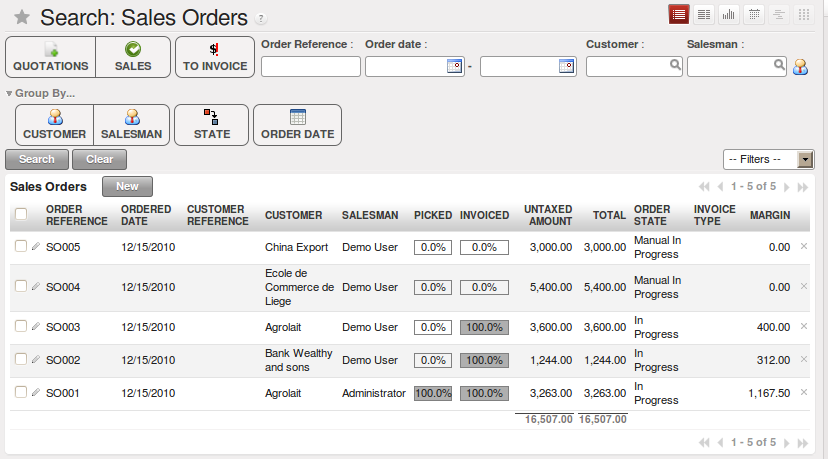
List of Orders with their Delivery State
Note
Negative Stock
Stock Management is very flexible to be more effective. For example, if you forget to enter products at goods-in, this will not prevent you from sending them to customers. In OpenERP, you can force all operations manually using the button Force Availability. In this case, your stocks risk to become negative. You should monitor all stocks for negative levels and carry out an inventory correction when that happens.
Partial Shipping
Should you have to process a partial delivery, you can go to Warehouse ‣ Warehouse Management ‣ Delivery Orders, then select the order to process it. In the new window, change the quantity to ship and then confirm it.
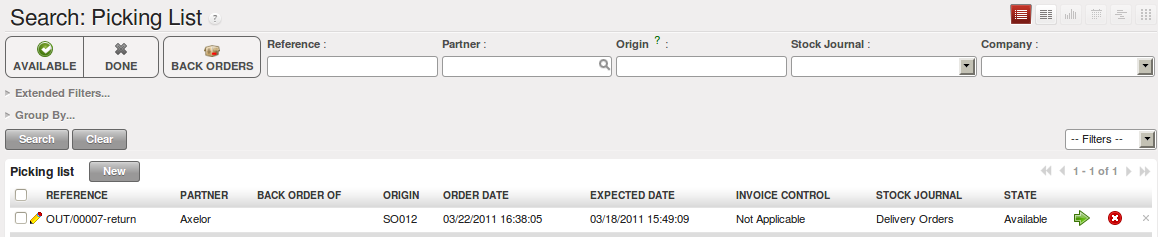
If you go back to the list view, you will now see a new delivery order with a back order number equal to the just confirmed order. This is illustrated in the following figure.

Partial Shipping
In the stock moves, you will see that there are two moves. The first move is for the remaining quantities to ship and the second one is for the shipped goods. There will be more stock moves if you process partial shipping in more than two times.

Stock Moves in Partial Shipping
Return Products from Customers
If a customer returns damaged or wrongly delivered products, you can enter this information in OpenERP via Warehouse ‣ Warehouse Management ‣ Delivery Orders.
You have to select the order related to the returned products and click the Return Products. A new window will open and will let you choose the invoicing method.

Return Products from Customers
When the product is returned, it will go back to your stock and you will see a stock move from Customers –> Shelf 1.
Stock Move for a Returned Product
Just In Time
By default, scheduling starts automatically once a day. You should make this scheduling execute overnight to ensure that the system does not slow down under a heavy load of scheduling when you are also trying to use it interactively.
To set the start time for the scheduler, go to the menu Administration ‣ Configuration ‣ Scheduler ‣ Scheduled Actions. Select the rule called ‘Run mrp scheduler’ and modify the date and time of the next execution.
Some companies want to plan orders progressively as they are entered, so they do not wait until procurement orders are planned the next day. Install the module mrp_jit (Reconfigure wizard, Just In Time Scheduling) to handle this. Once the module is installed, each requirement (that could result in a Production or Purchase Order) will be planned in real time as soon as it has been confirmed.
Then if you make a sales order with a product that is Make To Order, the quotation request to a supplier will immediately be generated.
Tip
Delivery from the Supplier or to the Customer
The sale_supplier_direct_delivery module enables you to deliver the product directly from the supplier to the customer. At the time of writing, this module is in extra-addons. The logic that the product follows is configured individually for each product and affects only products marked Make to Order.
This mode does not always makes sense. Each order is processed immediately when confirmed. So if an order is to be delivered in three months, the scheduler will reserve goods in stock for each order once it has been confirmed. It would have been more sensible to leave these products available for other orders.
If a Purchase Order’s Invoicing Control is configured From Order, the scheduler will immediately create the corresponding supplier quotation request. It might have been better to delay it for several weeks, if you could have used the lead time to group the purchase with other future orders.
The negative effects of the Just in Time module are:
- Poor priority management between orders,
- Additionally stocked products.
Logistics Configuration through Advanced Routes
To configure your logistics for advanced push and pull, you need to install stock_location module (Reconfigure wizard, Advanced Routes) as explained before. A complete scenario will be developed at the end of this chapter.
This module supplements the Warehouse application by adding support for location paths per product, effectively implementing Push and Pull inventory flows.
Typically this could be used to:
- Manage product manufacturing chains,
- Manage default locations per product,
- Define routes within your warehouse according to business needs, such as:
- Quality Control
- After Sales Services
- Supplier Returns
- Help rental management, by generating automated return moves for rented products.
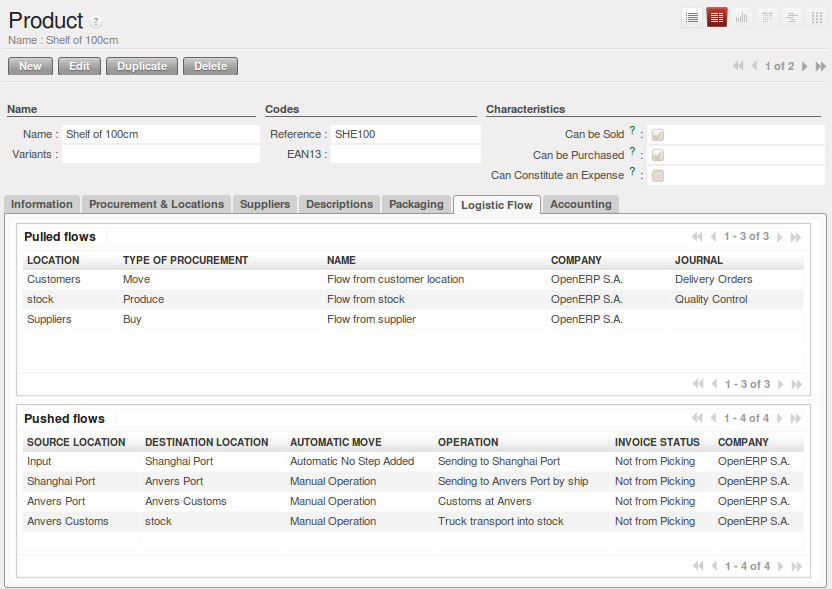
Once this module is installed, an additional Logistics Flows tab appears in the Product form, allowing you to add Push and Pull flow specifications.
Push Flow
Push flows are useful when the arrival of certain products in a given location should always be followed by a corresponding move to another location, optionally after a certain delay.
Note
Product
The core Warehouse Management application already supports such Push Flow specifications on the Locations, but these cannot be refined per product.
A push flow specification indicates which location is chained with another location, as well as the parameters used. As soon as a given quantity of products is moved to the source location, a chained move is automatically foreseen according to the parameters set on the flow specification (destination location, delay, type of move, journal, etc.) The new move may be processed automatically, or may require a manual confirmation, according to what you have defined.
Suppose whenever the demo data product CPU3 enters the Stock location, it first has to be moved to the Quality Control location in order to check the quality.
Look up the product CPU3 using the menu Warehouse ‣ Product ‣ Products.
To have OpenERP accomplish this move automatically, you have to configure the Push flow as follows:
- Operation: Receptions to Quality Control
- Source Location: Stock
- Destination Location: Quality Control
- Automatic Move: Automatic No Step Added
- Delay (days): 1
- Shipping Type: Getting Goods
- Invoice Status: Not Applicable
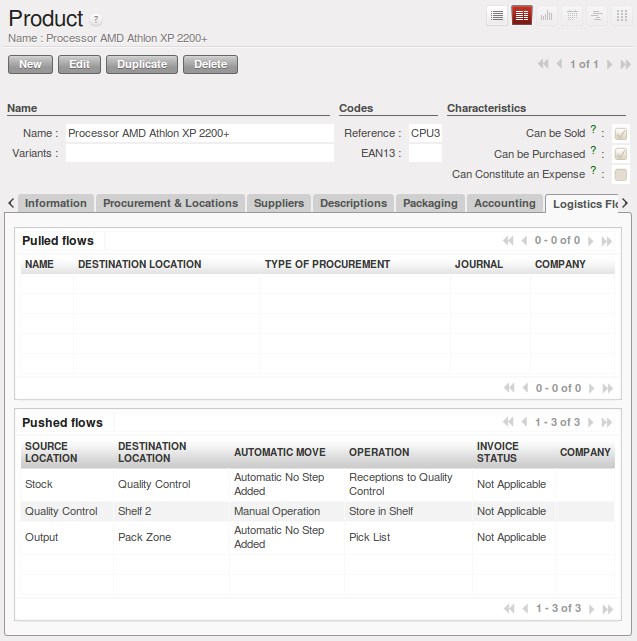
Push Flow Specification for Product CPU3
A push flow is related to how stock moves should be generated in order to increase or decrease inventory.
Pull Flow
Pull flows are a bit different from Push flows, in the sense that they are not related to the processing of product moves, but rather to the processing of procurement orders. What is being pulled is a need, not directly products.
A classical example of a Pull flow is when you have an Outlet company, with a parent Company that is responsible for the supplies of the Outlet.
[ Customer ] <- A - [ Outlet ] <- B - [ Holding ] <- C - [ Supplier ]
Tip
Demo Data
In our demo data example, the Outlet Company is Shop 1, while OpenERP SA is the parent company.
When a new procurement order A (resulting from the confirmation of a Sales Order, for example) is created in the Outlet (Shop 1), it is converted into another procurement B (through a Pull flow of the ‘move’ type) requested from the Holding. When procurement order B is processed by the Holding company (OpenERP SA), and if the product is out of stock, it may be converted into a Purchase Order (C) from the Supplier (Push flow of the ‘Buy’ type). The result is that the procurement order, the need, is pushed all the way between the Customer and Supplier.
Technically, Pull flows allow to process procurement orders differently, not only depending on the product being considered, but also depending on which location holds the “need” for that product (i.e. the destination location of that procurement order).
To explain a pull flow for the product CPU1, we first have to configure the minimum stock rules of CPU1 for the company OpenERP S.A. and Shop 1 using the menu Warehouse ‣ Automatic Procurements ‣ Minimum Stock Rules or by selecting the product concerned and then clicking the Minimum Stock Rules action.
Note
Minimum Stock Rules
If you work with the demo data, these minimum stock rules have already been defined.
For the company OpenERP S.A.:
- Min Quantity : 10
- Max Quantity : 50
For the company Shop 1;
- Min Quantity : 10
- Max Quantity : 20
Look up the product CPU1 using menu Warehouse ‣ Product ‣ Products in order to define the configuration of the pulled flow.
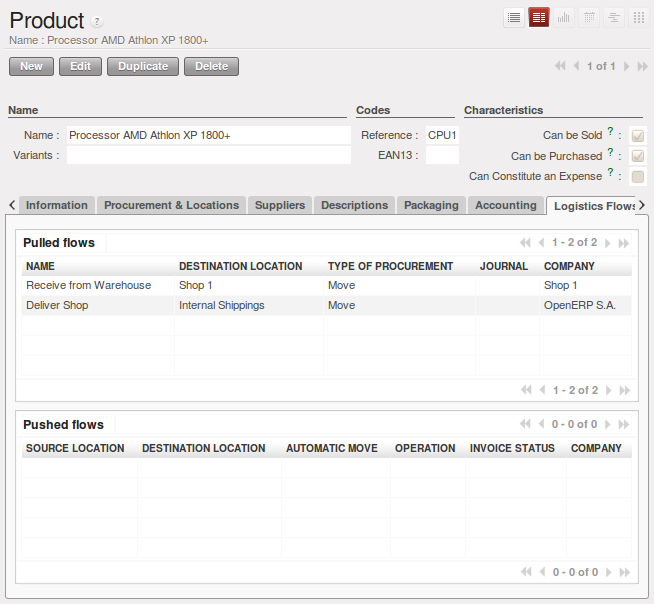
Pull Flow Specification for Product CPU1
There are two specifications of a pull flow for product CPU1.
Specification 1:
- Name : Receive from Warehouse
- Destination Location : Shop 1
- Type of Procurement : Move
- Source Location : Internal Shippings
- Partner Address : OpenERP S.A., Belgium Gerompont Chaussee de Namur 40
- Shipping Type : Getting Goods
- Procure Method : Make to Order
- Invoice Status: Not Applicable
Specification 2:
- Name : Deliver Shop
- Destination Location : Internal Shippings
- Type of Procurement : Move
- Source Location : Stock
- Partner Address : Fabien
- Shipping Type : Sending Goods
- Procure Method : Make to Stock
- Invoice Status: Not Applicable
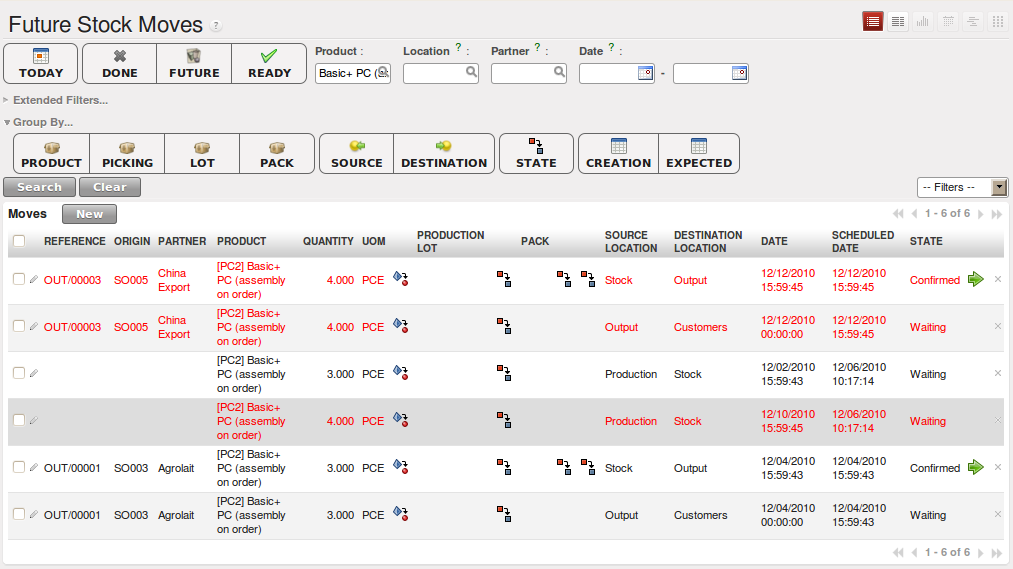
Now sell 1 unit of product CPU1 from the Shop1 (do not forget to confirm your sales order) and run the scheduler using the menu Warehouse ‣ Schedulers ‣ Compute Schedulers. Then check the stock moves for product CPU1 from the menu Warehouse ‣ Traceability ‣ Stock Moves.

Stock Move of CPU1 related to Pull Flow Specification
These moves can be explained like this:
[ Customer ] <– [ Shop 1 ] <– Internal Shippings <– Stock <– [ OpenERP S.A. ]
When the company Shop 1 sells one unit of CPU1 to a customer, its stock decreases to 10 units. According to the minimum stock rule of the product CPU1, OpenERP generates a procurement order of 21 units of CPU1 for the company Shop 1 (OP/00007, or another number if you have added extra data). So 21 units of CPU1 move from OpenERP S.A. Stock to Shop 1 according to their internal configuration of Source and Destination Locations.
A pull flow is related to how the procurement process runs in order to find products to increase or decrease inventory.
Procurement Methods – Make to Stock and Make to Order
The procurement method determines how the product will be replenished:
- Make to Stock: your customers are supplied from available stock. If the quantities in stock are too low to fulfil the order, a Purchase Order (according the minimum stock rules) will be generated in order to get the products required. Example: a classic distributor.
- Make to Order: when a customer order is confirmed, you procure or manufacture the products for this order. A customer order ‘Make to Order’ will not modify stock in the medium term because you restock with the exact amount that was ordered. Example: computers from a large supplier assembled on demand.
You find a mix of these two modes used for the different final and intermediate products in most industries. The procurement method shown on the product form is a default value for the order, enabling the salesperson to choose the best mode for fulfilling a particular order by varying the sales order parameters as needed.
The figures Change in Stock for a Make to Stock Product and Change in Stock for a Make to Order Product show the change of stock levels for one product managed as Make to Order and another managed as Make to Stock. The two figures are taken from OpenERP’s Stock Level Forecast report, available from the product form.
Change in Stock for a Make to Stock Product
Change in Stock for a Make to Order Product
Note
Logistical Methods
The Make to Stock logistical approach is usually used for high volumes and when the demand is seasonal or otherwise easy to forecast. The Make to Order approach is used for products that are measured, or very expensive to stock or have a short restocking time.
Choosing Supply Methods
OpenERP supports two supply methods:
- Produce: when the product is manufactured or the service is supplied from internal resources.
- Buy: when the product is bought from a supplier.
These are just the default settings used by the system during automated replenishment. The same product can be either manufactured internally or bought from a supplier.
These three fields (Supply Method, Procurement Method, Product Type) determine the system’s behaviour when a product is required. The system will generate different documents depending on the configuration of these three fields when satisfying an order, a price quotation to a supplier or a manufacturing order.
OpenERP manages both stockable products and services. A service bought from a supplier in Make to Order mode, will generate a subcontract order from the supplier in question.
Figure Workflow for Automatic Procurement, depending on the Product Configuration illustrates different cases for automatic procurement.
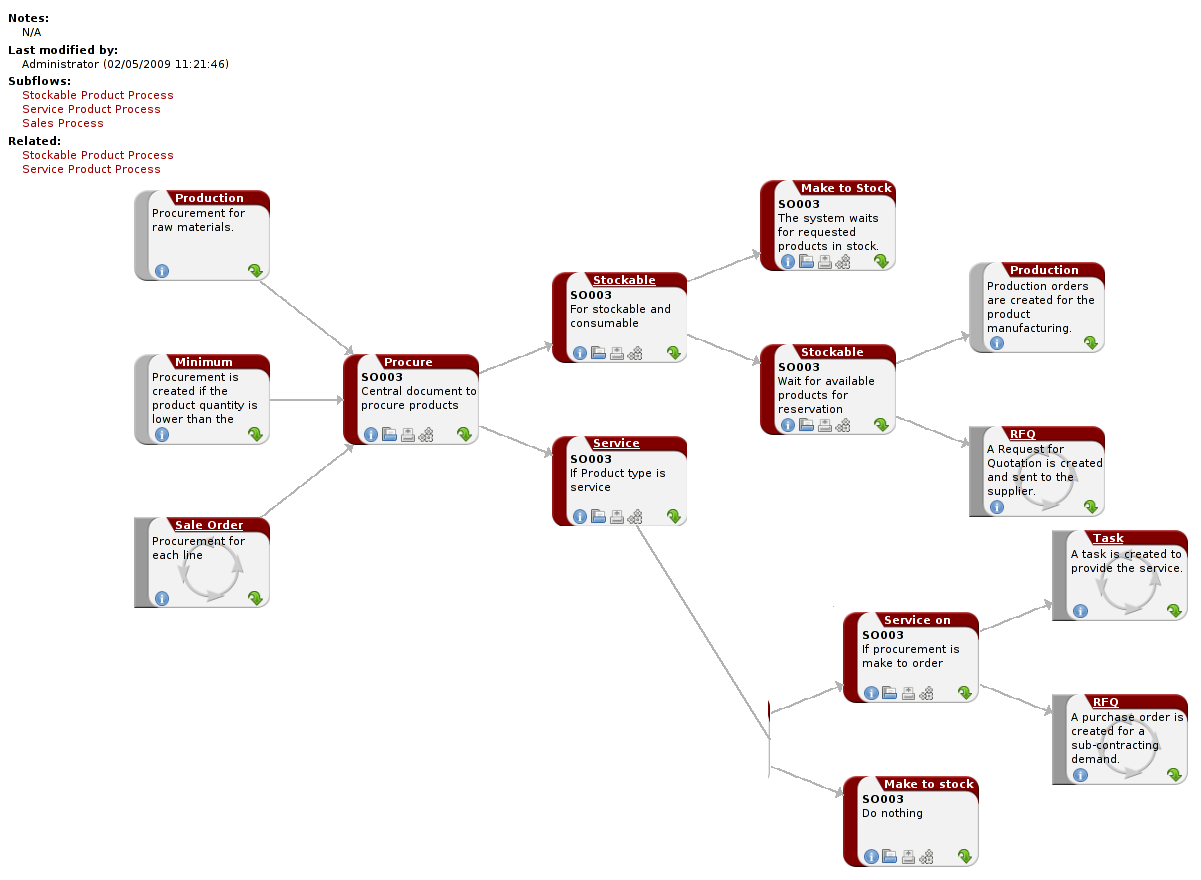
Workflow for Automatic Procurement, depending on the Product Configuration
The table below shows all possible cases for the figure Workflow for Automatic Procurement, depending on the Product Configuration.
| Procurement Method | Produce | Buy |
|---|---|---|
| MTS | Wait for availability | Wait for availability |
| MTO | Production Order | Purchase Order |
| Procurement Method | Produce | Buy |
|---|---|---|
| MTS | / | / |
| MTO | Create task | Subcontract |
Packaging with Various Logistics Units of Measure
Units of Measure
OpenERP supports several units of measure. Quantities of the same product can be expressed in several units of measure at once. For example, you can buy grain by the tonne and resell it by kg. You just have to make sure that all the units of measure used for a product are in the same units of measure category.
Note
Categories of Units of Measure
All units of measure in the same category are convertible from one unit to another.
The table below shows some examples of units of measure and their category. The factor is used to convert from one unit of measure to another as long as they are in the same category.
| UoM | Category | Ratio | UoM Type |
|---|---|---|---|
| Kg | Weight | 1 | Reference |
| Gram | Weight | 1000 | Smaller |
| Tonne | Weight | 1000 | Bigger |
| Hour | Working time | 8 | Smaller |
| Day | Working time | 1 | Reference |
| Half-day | Working time | 4 | Smaller |
| Item | Unit | 1 | |
| 100 Items | Unit | 0.01 |
Depending on the table above, you have 1Kg = 1000g = 0.001 Tonnes. A product in the Weight category could be expressed in Kg, Tonnes or Grammes. You cannot express it in hours or pieces, for example.
Use the menu Warehouse ‣ Configuration ‣ Products ‣ Units of Measure ‣ Units of Measure to define a new unit of measure.
In the definition of a Unit of Measure, you have a Rounding precision factor which shows how amounts are rounded after the conversion. A value of 1 gives rounding to the level of one unit. 0.01 gives rounding to one hundredth.
Note
Secondary Units
OpenERP supports double units of measure. Notice however that the default unit of measure and the purchase unit of measure have to be in the same category. Only the sales unit of measure may be in a different category.
This is very useful in the agro-food industry, for example: you sell ham by the piece, but invoice by the Kg. A weighing operation is needed before invoicing the customer.
To activate the management options for double units of measure, assign the group Useability / Product UoS View to your user.
In this case, the same product can be expressed in two units of measure belonging to different categories for sales and stock/purchase. You can then distinguish between the unit of stock management (the piece) and the unit of invoicing or sales (kg).

Secondary Unit of Measure
In the product form you can set one unit of measure for sales and stock management, and one unit of measure for purchases.
For each operation on a product, you can use another unit of measure, as long as it can be found in the same category as the two units already defined. If you use another unit of measure, OpenERP automatically handles the conversion of prices and quantities.
So if you have 430 Kg of carrots at 5.30 EUR/Kg, OpenERP will automatically make the conversion if you want to sell in tonnes – 0.43 tonnes at 5300 EUR / tonne. If you had set a rounding factor of 0.1 for the tonne unit of measure, OpenERP will tell you that you have only 0.4 tonnes available.
Packaging
The packaging allows you to ship products in several ways. For example, you can ship goods by boxes or by pallets.
At first, you have to define possible packaging. To define the packaging, go to :menuselection: Warehouse –> Configuration –> Product –> Packaging and click New.
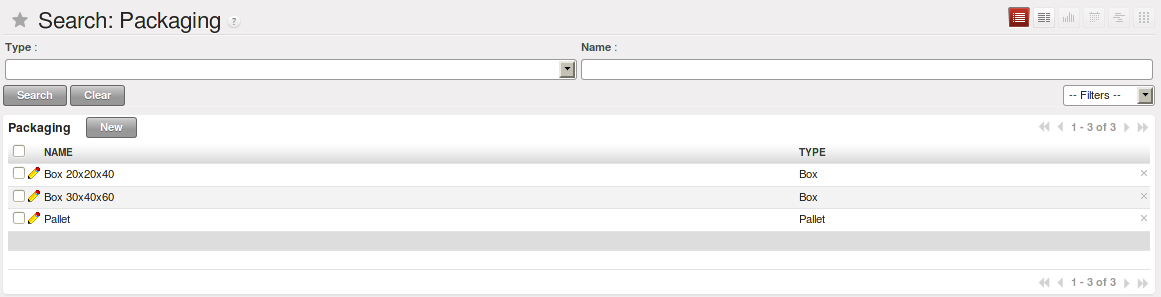
Packaging definition
To complete the creation of a new packaging, you have to give it a name and a type. Different types are available in OpenERP: Box, Pack, Pallet and Unit.
Once all packaging is defined, you can attach the packaging to your products through the following menu: Warehouse ‣ Configuration ‣ Product ‣ Packaging.
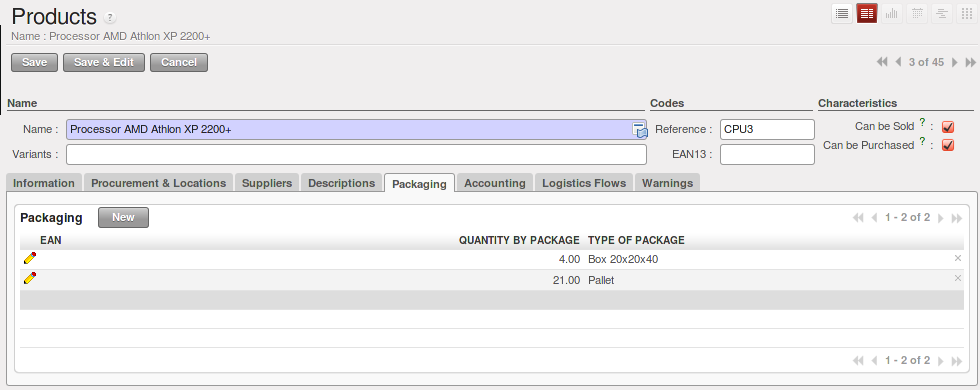
Defining the Packaging for the Product