Managing Physical Inventory Structure
Warehouse
Warehouses are designed for physical locations from which you can deliver to the customer, and to which you receive raw materials. When you buy products from a supplier, you should take account of the Warehouse you use for this purchase. This also enables the end user to not have to choose from a list of locations, but simply a real warehouse. Use the menu Warehouse ‣ Configuration ‣ Warehouse Management ‣ Warehouses, then click New to configure a new warehouse.
A warehouse is defined by a link between three locations:
- The Location Stock field shows the place of products available for delivery to a customer directly from this warehouse. Availability is given by all the products in that location and any child locations.
- The Location Input field shows where ordered products are received from a supplier in that warehouse. It can be the same as the stock location if, for example, you want to do a quality control operation on your incoming raw materials.
- The Location Output field (called Output in the demonstration database) is designed as a buffer zone in which you store all the items that have been picked, but not yet delivered to a customer. You are strongly advised not to put this location within the stock hierarchy but instead at a higher level or at the same level.
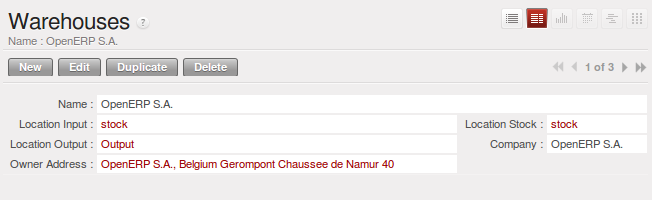
Warehouse Parameters
You can also set an address for the warehouse. This address should ideally be an address of your company. Once the warehouse has been defined, it can be used in:
- Minimum stock rules,
- Supplier orders,
- Customer orders (using the definition of a point of sale, which is linked to a warehouse).
Automatic Procurement
Several methods of automatically procuring products can be carried out by OpenERP:
- the workflow used by products that have the procurement method Make to Order,
- using minimum stock rules for Make to Stock products,
- using the master production schedule for Make to Stock products.
The last two methods are described below.
Minimum Stock Rules
To automatically make stock replenishment proposals, you can use minimum stock rules. Go to the menu Warehouse ‣ Automatic Procurements ‣ Minimum Stock Rules.
The rule is the following: if the virtual stock for the given location is lower than the minimum stock indicated in the rule, the system will automatically propose a procurement to increase the level of virtual stock to the maximum level given in the rule.
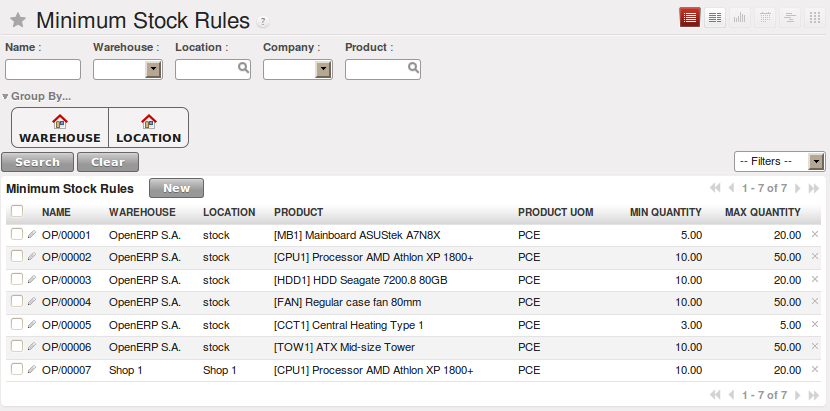
List of Minimum Stock Rules
Tip
Conflict Resolution
You may find draft production or procurement orders to be created although they should not exist. That can happen if the system is badly configured (for example, if you have forgotten to set the supplier on a product).
To check this, look at the list of procurements in the exception state in the menu Warehouse ‣ Schedulers ‣ Procurement Exceptions. More details about processing these exceptions is given in ch-mnf.
We underline that the rule is based on virtual quantities and not just on real quantities. It takes into account the calculation of orders and receipts to come.
Take the following example:
- Products in stock: 15
- Products ordered but not delivered: 5
- Products in manufacturing: 2
The rules defined are:
- Minimum stock: 13
- Maximum stock: 25.
Once the rules have been properly configured, the purchasing manager only needs to look at the list of orders for confirmation with the supplier using the menu Purchases ‣ Purchase Management ‣ Requests for Quotation.
Note
Procurement
Note that the procurement does not require that you buy from a supplier. If the product has a Supply Method Produce, the scheduler will generate a Manufacturing order instead of a supplier order.
You can also set multiple quantities in the minimum stock rules. If you set a multiple quantity of 3 the system will propose procurement of 15 pieces, and not the 13 it really needs. In this case, it automatically rounds the quantity upwards.
Note
Maximum Quantity
Pay attention to the fact that the maximum quantity is not the maximum you will have in stock. If we take the following situation: a company has 10 pieces of product with minimum stock rules defined for this product by Min quantity = 10, Max quantity = 30 and Qty multiple = 12. If an order of 2 pieces comes, a purchase of 24 pieces order will be executed. The first 12 pieces will be ordered to reach the minimum quantity and the other 12 to reach the maximum quantity. At the end, the stock of this product will be equal to 32 pieces.
In a minimum stock rule, when you indicate a warehouse, it suggests a stock location by default in that warehouse. You can change that default location when the scheduler completes.
Location
A location is one component of the warehouses that is used to managed all types of storage places, such as at the customer’s and production counterparts.
There are different types of locations that allow you to structure your warehouses according to your needs. Locations are structured hierarchically to account for the subdivision of a warehouse into sections, aisles, and/or cupboards. The hierarchical view also enables you to structure virtual locations such as production counterparts. That gives you a finer level of analysis. Go to the menu Warehouse ‣ Configuration ‣ Warehouse Management ‣ Locations, then click New to define new locations.
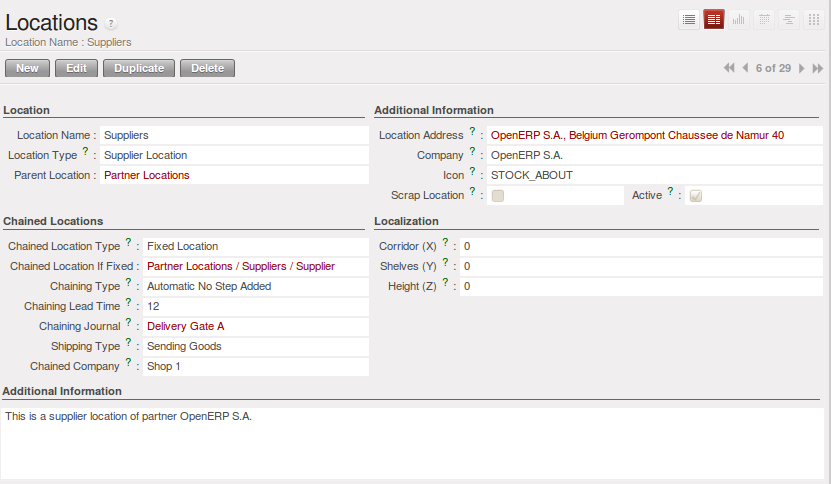
Defining a new Stock Location
Here are the different available types of locations:
- Supplier Location: virtual location representing the source location for products received from suppliers,
- View: shows that the location is only an organizational node for the hierarchical structure, and cannot be involved in stock moves itself. The view type is not made into a leaf node in a structure – it usually has children.
- Internal Location: physical location inside your own stock,
- Customer Location: virtual location representing the destination for products sent to customers,
- Inventory: virtual location serving as the counterpart for inventory operations used to correct stock levels (physical inventories),
- Procurement: virtual location serving as temporary counterpart for procurement operations when you do not yet know the source (supplier or production). Products in this location should be zero after the scheduler run completes,
- Production: virtual counterpart location for production operations; consuming raw material and sending finished products,
- Transit Location for Inter-Companies Transfers: used as an intermediate location in a multi-company environment.
You can have several locations of the same type. In that case, your product, supplier and warehouse configurations determine the location that is to be used for any given operation.
Location Addresses
Each location can have a specific address that enables you to create a location for a customer or a supplier, for example. You can then give it the address of that customer or supplier. Go to the partner form to tell OpenERP it should use this location rather than the default location given to partner deliveries.
Tip
Subcontracting Production
You will see in the on line chapter Manufacturing that it is possible to assign a location to a manufacturing workcenter. If this location is at a suppliers, you must give it an address so that OpenERP can prepare a delivery order for the supplier and a receive operation for the manufactured goods. Creating a location specifically for a partner is also a simple solution for handling consigned stocks in OpenERP.
Note
Consigned Stock
Consigned stock is stock that is owned by you (valued in your accounts), but is physically stocked by your supplier. Or, conversely, it could be stock owned by your customer (not valued by you), but stocked in your company. Make sure that you create consignment locations as part of your internal stock.
To enable you to easily consolidate at a higher level, the location definition is hierarchical. This structure is given by the field Parent Location. That also enables you to manage complex cases of product localization.
For example, you could imagine the following scenario: One Company with Two Warehouses
A company has a warehouse in Paris and in Bordeaux. For some orders, you have to deliver the products from Paris, and for others from Bordeaux. But you should also specify a fictitious warehouse that OpenERP uses to calculate whether it should deliver products from Paris or from Bordeaux. To do this in OpenERP, you would create a third warehouse ‘France’ which consolidates the warehouses in Paris and Bordeaux. You create the following physical locations:
- Company
- Output
- Warehouses France
- Warehouse Paris
- Warehouse Bordeaux
- Warehouses France
- Output
OpenERP will then deliver the goods from the warehouse that has the ordered product in stock. When products are available in several warehouses, OpenERP will select the nearest warehouse. To formalize the notion of distance between warehouses you should use the geographic co-ordinates (X, Y, Z) of the different stores to enable OpenERP to search for the nearest goods. The same co-ordinates could also be used to structure the shelves, aisles and interior rooms in a warehouse.
Linked Locations
Locations in OpenERP can be linked between each other to define paths followed by products. So you can define rules such as: all products that enter the warehouse should automatically be sent to quality control. The warehouse and quality control are represented by two different locations.
Then when a product arrives in a location, OpenERP can automatically suggest that you send the product to another linked location. Three link modes are available:
- Manual Operation,
- Automatic Move,
- Automatic No Step Added.
The Manual Operation mode will create an internal move order to the linked location once products arrive in the source locations. This order will wait for a confirmation of the move by a user. This enables you to have a list of moves to do, proposed by the system and confirmed by the storesperson.
The Automatic Move mode will do the same, but will not wait for a confirmation from the user. Products will automatically be sent to the linked location without any intervening manual operation to do. This corresponds to the case where, for simplicity, you delete a step in the process so the end user can set off the process automatically.
The Automatic No Step Added mode will not include the additional stock move, but will change the destination move transparently to assign the linked location. You could then assign a destination location to which you send all the products that arrive in your warehouse. The storesperson will modify the goods receipt note.
Tip
Product Logistics
The module stock_location lets you generate paths to follow, not just at the level of locations, but also at the level of products. It then enables you to manage default locations for a given product or to refer to the products as a function of operations such as quality control, supplier receipt, and after-sales service.
A more detailed explanation of this module, with examples, is given at the end of this chapter.
If there is linking to do, the Chained Location Type field allows you to determine the destination location. If the field is set to ‘Customer’, the location is given by the properties of the partner form. If the field is set to fixed, the destination location is given by the field Chained Location If Fixed.
Some operations take a certain time between order and execution. To account for this lead time, you can set a value in days in the field Chaining Lead Time. Then the extra move (automatic or not) will be carried out several days after the original move. If you use the mode Automatic No Step Added, the lead time is inserted directly into the initial order. In this way, you can add security lead times at certain control points in the warehouse.
Structuring Locations
In the next part, you will see that by linking locations you can manage a whole series of complex cases for efficient production management:
- Handling multiple operations for a customer order,
- Tracking import and export by sea transport,
- Managing a production chain in detail,
- Managing rented products,
- Managing consigned products.
To show these concepts, different cases of structuring and configuring these locations are given below. Many other configurations are possible according to company needs.
Examples:
- Handling customer orders
Customer orders are usually handled in one of two ways:
- item note (or preparation order), confirmed when the item is ready to send,
- delivery order (or freight note), confirmed when the transporter has delivered the item to a customer.
You use the following stock move in OpenERP to simulate these operations:
- Packing Note: Stock > Output,
- Delivery Order: Output > Customer.
The first operation is automatically generated by the customer order. The second one is generated by the stock management, showing that the Output location is linked to the Customer location. The two operations will be displayed in Waiting status. If the Output location is not situated beneath the stock location, you then have to move the item from stock to the place where the item is prepared.
Some companies do not want to work in two steps, because it just seems like extra work to have to confirm a delivery note in the system. You can then set the link mode to ‘Automatic’ to make OpenERP automatically confirm the second step. It is then assumed all the items have automatically been delivered to the customer.
- Linked production
The stock_location module enables you to manage the linkages by product in addition to doing that by location. You can then create a location structure that represents your production chain by product.
The location structure may look like this:
Stock
Level 1
Level 2
- Link 1
- Operation 1
- Operation 2
- Operation 3
- Operation 4
- Link 1
You can then set the locations a product or a routing must go through in the relevant form. All products that enter the production chain will automatically follow the predetermined path. You can see the location structure using Warehouse ‣ Inventory Control ‣ Location Structure.
Shop
The counterparts for procurement, inventory and production operations are given by the locations shown in the product form. The counterparts of reception and delivery operations are given by the locations shown in the partner form. The choice of stock location is determined by the configuration of the warehouse, linked to a Shop, which can be defined using Sales ‣ Configuration ‣ Sales ‣ Shop.
Once a shop is defined, you will be able to make sales orders from this shop. You need at least one shop in order to be able to make sales orders.
Stock
In the Product form, the Stock by Location action will give you the stock levels of the various products in any selected location. If you have not selected any location, OpenERP calculates stocks for all of the physical locations. When you are in the Stock by Location view, click the Print button to print the Location Content or the Location Inventory Overview reports.
Note
Availability of Stock
Depending on whether you look at the product from a customer order, or from the menu of a product form, you can get different values for stock availability. If you use the Product menu, you get the stock in all of the physical stock locations. Looking at the product from the order you will only see the report of the warehouse selected in the order.
In this respect, two important fields in the product form are:
- Real Stock: Quantity physically present in your warehouse,
- Virtual Stock: Calculated as follows: real stock – outgoing + incoming.
Note
Virtual Stock
Virtual stock is very useful because it shows what the salespeople can sell. If the virtual stock is higher than the real stock, this means products will be coming in. If virtual stock is smaller than real stock, certain products are reserved for other sales orders or work orders.
Tip
Detail of Future Stock
To get more details about future stock, you can click Stock Level Forecast to the right of the product form to get the report Forecast Stock Levels as illustrated below. OpenERP shows a graph of the changes in stock in the days to come, varying as a function of purchase orders, confirmed production and sales orders.
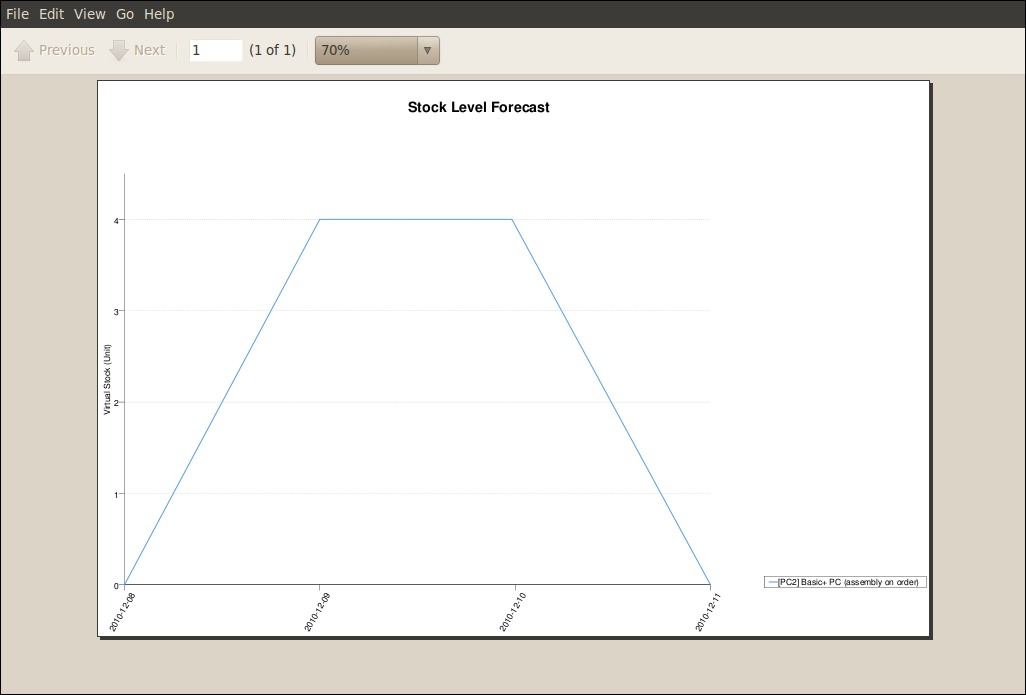
Printout of forecast stock levels
Tip
Filter Stock by Location
By default, in Product list view, the columns Real Stock and Virtual Stock show the stock figures for all stock locations where a product is stored. Use the Extended Filters to enter a specific stock location, if you want to only see the stock in a specific location.
Lead Times and Locations
The tab Procurement & Locations in the Product form contains information about different lead times and locations. Three lead time figures are available:
- Customer Lead Time: lead time promised to the customer, expressed in number of days between the order and the delivery to the customer,
- Manufacturing Lead Time: lead time, in days, between a production order and the end of production of the finished product,
- Warranty (months): length of time in months for the warranty of the delivered products.
Note
Warranty
The warranty period is used in the Repairs management and after-sales service. You can find more information on this subject in the on line chapter about Manufacturing.
Fields in the section Storage Localisation are for information only; they do not have any impact on the management of stock.
Counter-Part Locations Properties are automatically proposed by the system, but the different values can be modified. You will find counterpart locations for:
- Procurement,
- Production,
- Inventory.
A procurement location is a temporary location for stock moves that have not yet been finalized by the scheduler. When the system does not yet know if procurement is to be done by a purchase or production, OpenERP uses the counterpart location Procurement. In this location, you will find everything that has not yet been planned by the system. The quantities of product in this location cancel each other out.
Initial Inventory
Once a product has been defined, use an initial inventory operation to put current quantities into the system by location for the products in stock. Go to the menu Warehouse ‣ Inventory Control ‣ Physical Inventories to do your initial inventory.

Defining a New Inventory Operation
Give a name (for example Initial Inventory or Lost Product XYZ) and a date (proposed by default) for each inventory operation.
You have three ways of doing an inventory.
- Click the Import Inventory action and select the location concerned. You can choose to include child locations and set the inventory to zero (especially useful to ensure the count is done correctly).
- You can update the inventory from the Product form. Go to the Information tab, Stocks section, and click the Update button. On confirmation, OpenERP will create a Physical Inventory.
- You can manually add inventory lines. You can then enter data about the quantities available for each product by location. Start by entering the location, for example Stock, and then select the product. OpenERP automatically completes the quantity available for that product in the location shown. You can then change that value to correct the value in stock.
Enter data for a single line in your inventory:
- Location : Stock,
- Product : PC1 Basic PC,
- Quantity : 23 Units.
When your inventory operation is finished, you can confirm it using the Confirm Inventory button to the bottom right of the form. OpenERP will then automatically create the stock moves to close the gaps, as mentioned at the start of this chapter. You can verify the moves generated using the Posted Inventory tab of the inventory operation form.
The correct levels of your product are now in your stock locations. A simple way of verifying this is to reopen the product form to see the quantities available in stock.
Tip
Periodical Inventory
You are usually legally required to do a stock check of all your products at least once a year. As well as doing a complete annual stock check, OpenERP also supports the method of periodical inventory.
That means you can check the stock levels of a proportion of your products every so often. This system is accepted in France as long as you can guarantee that all of your products have been counted at least once per year. To see the last inventory count per product, use the report Warehouse ‣ Reporting ‣ Last Product Inventories.
You can do this the same way for all products and all locations, so you only carry out small inventory operations through the year, rather than a single large stock check at one point in the year (which usually turns out to be at an inconvenient time).