Bill of Materials and Components
Using Bills of Materials
Bills of Materials are documents that describe the list of raw materials used to make a finished product. To illustrate the concept of specification, you will work on a shelf (or cabinet) where the manufacturing plan is given by the figure Plan of Construction of a Shelf.
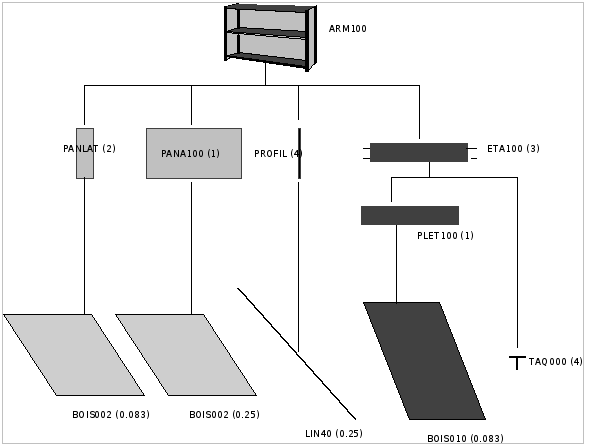
Plan of Construction of a Shelf
The shelf is assembled from raw materials and intermediate assemblies. The Image Code refers to the picture, the Product Reference is the corresponding code in OpenERP.
Change the unit of the Wood Lintel 4m (LIN40) product to m instead of PCE.
| Image Code | Product Reference | Description |
|---|---|---|
| ARM100 | SHE100 | Shelf 100 cm |
| PANLAT | SIDEPAN | Side Panel |
| PANA100 | RPAN100 | Rear Panel SHE100 |
| PROFIL | PROFIL | Assembly Section |
| ETA100 | RCK100 | Rack 100cm |
| BOIS002 | WOOD002 | Wood 2mm |
| TAQ000 | METC000 | Metal Cleats |
| LIN40 | LIN40 | Wood Lintel 4m |
| Image Code | Product Reference | Description |
|---|---|---|
| PLET100 | SPAN100 | Shelf Panel |
| BOIS010 | WOOD010 | Wood 10mm |
Tip
Copy
To create the above products, duplicate existing ones, such as Side Panel and Wood 2mm, from the Purchase or Sales menu Purchases ‣ Products ‣ Products.
To describe how this shelf should be assembled, you define a bill of materials for each intermediate product and for the final shelf assembly. These are shown in the tables below. You can start from the demo data and complete them according to the specifications. To create or change a bill of materials, go to Manufacturing ‣ Master Data ‣ Bill of Materials.
| Product Ref. | Quantity | Unit of Measure |
|---|---|---|
| PROFIL | 4 | PCE |
| SIDEPAN | 2 | PCE |
| METC000 | 12 | PCE |
| RPAN100 | 1 | PCE |
| RCK100 | 3 | PCE |
| Product Code | Quantity | Unit of Measure |
|---|---|---|
| SPAN100 | 1 | PCE |
| METC000 | 4 | PCE |
| Product Code | Quantity | Unit of Measure |
|---|---|---|
| WOOD010 | 0.083 | m |
| Product Code | Quantity | Unit of Measure |
|---|---|---|
| LIN40 | 0.25 | m |
| Product Code | Quantity | Unit of Measure |
|---|---|---|
| WOOD002 | 0.25 | m |
| Product Code | Quantity | Unit of Measure |
|---|---|---|
| WOOD002 | 0.083 | m |
The bills of materials are then used by the software to calculate the raw material needs based on the requirements of the finished products. So if you want to manufacture 10 shelves, the system can calculate the actual products that will be consumed:
| Product Code | Quantity | Unit of Measure |
|---|---|---|
| WOOD002 | 0.416 (2 * 0.083 + 0.25) | m |
| LIN40 | 1 (4 * 0.25) | m |
| WOOD010 | 0.249 (0.083 * 3) | m |
| METC000 | 132 ((3 * 4) + (10 * 12)) | PCE |
Tip
Bill of Materials
To see the bill of materials in tree view, use the menu Manufacturing ‣ Master Data ‣ Bill of Materials then select the product and click the action BOM Structure.
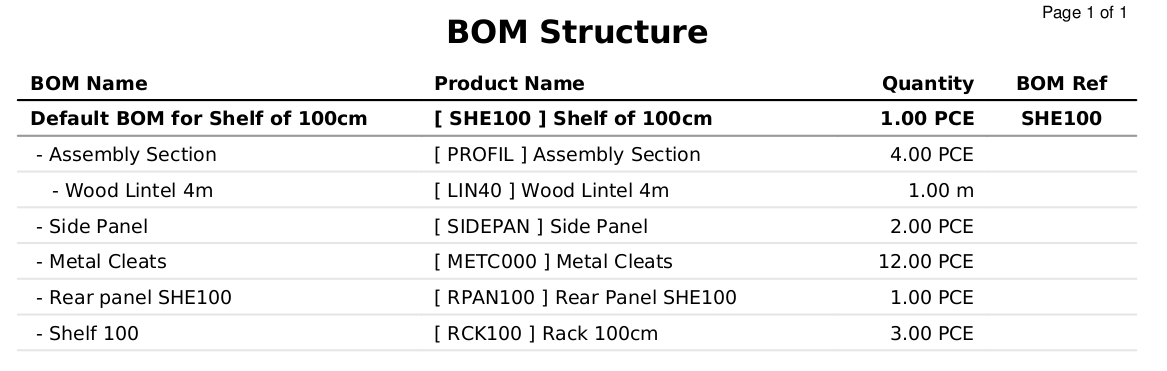
Bill of Materials structure
Use the menu Manufacturing ‣ Master Data ‣ Bill of Materials and click the New button to define a new bill of materials.
Tip
The Different Views
To change the view in the bill of materials you can:
- From the list, select a bill of materials name and then click Form View,
- From a product form, use the menu Product BoM Structure to the right.
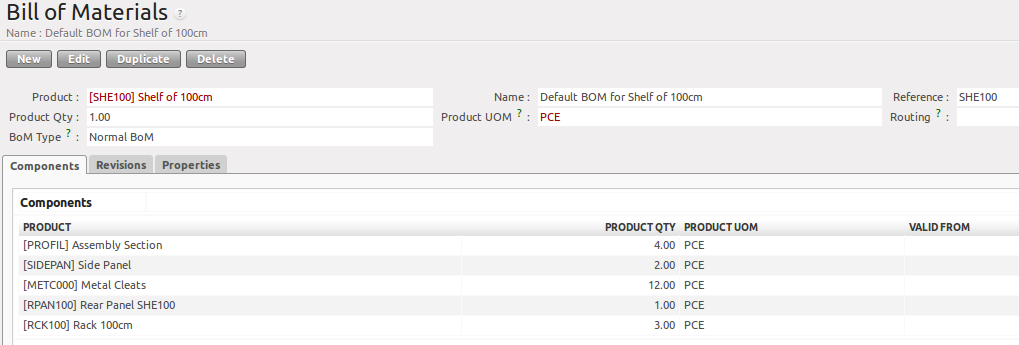
Defining a Bill of Materials (Extended view)
In the Product field of the bill of materials, you should set the finished product, which will be manufactured or assembled. Once the product has been selected, OpenERP automatically completes the name of the bill of materials and the default Unit of Measure for this product.
The type of BoM (BoM Type : Sets/Phantom or Normal BoM) and the Routing field will be described in more detail later in the chapter.
Now you can select the raw materials (Components) that are used to manufacture the finished product. The quantities are set out based on the quantities of finished product and the quantities needed to produce them from the bill of materials.
The second tab, Revisions, is used to register all the changes made to the bill of materials. On each change, you can specify a revision number and some notes on the modifications you carried out.
Note
Simplified View
The Revisions tab is only visible if the user works in the Extended view mode (which means that the user should belong to the group Useability / Extended View .
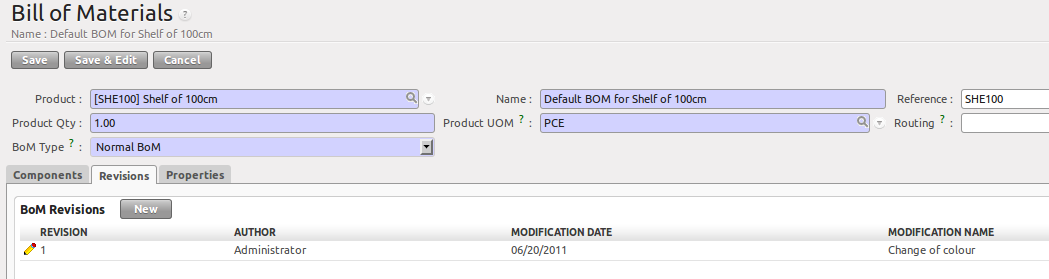
Revisions of a Bill of Materials (Extended view)
In the third tab, Properties, you can put a free text reference to a plan, a sequence number that is used to determine the priorities between bills of materials, dates between which a bill of materials is valid, and values for rounding and production efficiency.
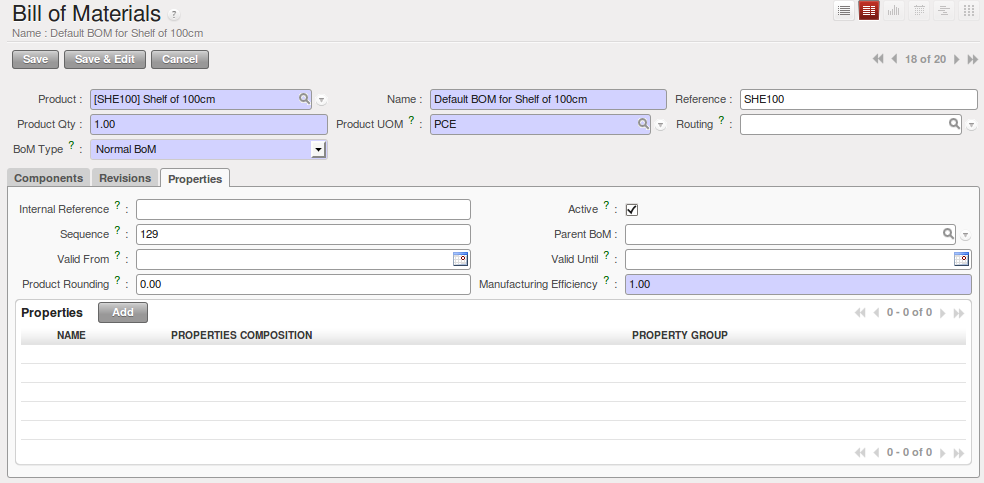
Properties of a Bill of Materials
Rounding is used to set the smallest Unit of Measure in which the quantities of the selected product can be expressed. So if you set the rounding to 1.00, you will not be able to manufacture half a piece. The Efficiency of the product lets you indicate the percentage you lose during manufacturing. This loss can be defined for the finished product or for each raw materials (components) line. The impact of this efficiency figure is that OpenERP will reserve more raw materials for manufacturing than you would otherwise use just from the Bill of Materials calculations.
The final part of the third tab lets you set some properties for the product’s manufacturing processes. These will be detailed further on in the chapter in the section about configurable products.
Multi-level Bills of Materials
In OpenERP, each line of a bill of materials may itself be a bill of materials. This allows you to define BoMs with several levels. Instead of defining several BoMs for the shelf in the figure Plan of Construction of a Shelf, you could define the single bill of materials below:
| Product Ref. | Quantity | Unit of Measure |
|---|---|---|
| SHE100 | 1 | PCE |
| SIDEPAN | 2 | PCE |
| WOOD002 | 0.166 | m |
| RPAN100 | 1 | PCE |
| WOOD002 | 0.25 | m |
| PROFIL | 4 | PCE |
| LIN40 | 1 | m |
| RCK100 | 3 | PCE |
| SPAN100 | 3 | PCE |
| WOOD010 | 0.249 | m |
| METC000 | 132 | PCE |
OpenERP behaves differently depending on whether the bill of materials is defined in several small BoMs each on a single level or in one BoM tree-structured on several levels.
If you select a BoM using intermediate products that automatically generates production orders based on calculated requirements, OpenERP will propose to manufacture an intermediate product. To manufacture a shelf according to the different bills of materials defined, you would create 6 production orders:
| Product Ref. | Quantity | Unit of Measure |
|---|---|---|
| SPAN100 | 3 | PCE |
| WOOD010 | 0.249 | m |
| Product Ref. | Quantity | Unit of Measure |
|---|---|---|
| RCK100 | 3 | PCE |
| SPAN100 | 3 | PCE |
| METC000 | 12 | PCE |
| Product Ref. | Quantity | Unit of Measure |
|---|---|---|
| PROFIL | 4 | PCE |
| LIN40 | 1 | m |
| Product Ref. | Quantity | Unit of Measure |
|---|---|---|
| RPAN100 | 1 | PCE |
| WOOD002 | 0.25 | m |
| Product Ref. | Quantity | Unit of Measure |
|---|---|---|
| SIDEPAN | 2 | PCE |
| WOOD002 | 0.17 | m |
| Product Ref. | Quantity | Unit of Measure |
|---|---|---|
| SHE100 | 1 | PCE |
| SIDEPAN | 2 | PCE |
| RPAN100 | 1 | PCE |
| PROFIL | 4 | PCE |
| RCK100 | 3 | PCE |
| METC000 | 12 | PCE |
In the case where a single bill of materials is defined in multiple levels, a single manufacturing order will be generated for each shelf, including all of the sub BoMs. You would then get the following production order:
| Product Ref. | Quantity | Unit of Measure |
|---|---|---|
| SHE100 | 1 | PCE |
| WOOD002 | 0.17 | m |
| WOOD002 | 0.25 | m |
| LIN40 | 1 | m |
| WOOD010 | 0.249 | m |
| METC000 | 132 | PCE |
Phantom Bills of Materials
If a finished product is defined using intermediate products that are themselves defined using other BoMs, OpenERP will propose to manufacture each intermediate product. This will result in several production orders. If you only want a single production order, you can define a single BoM with several levels.
Sometimes, however, it may be useful to define the intermediate product separately and not as part of a multi-level assembly, even if you do not want separate production orders for intermediate products.
In the example, the intermediate product RCK100 is used in the manufacturing of different shelves (SHE100, SHE200, ...). So you would prefer to define a unique BoM for it, even though you do not want any instances of this product to be built, nor would you want to rewrite these elements in a series of different multi-level BoMs.
If you only want a single production order for the complete shelf, and not one for the BoM itself, you can define the BoM line corresponding to product RCK100 in the shelf’s BoM as type Sets/Phantom. Then OpenERP will automatically put RCK100‘s BoM contents into the shelf’s production order, even though it has been defined as multi-level.
This way of representing the assembly is very useful, because it allows you to define reusable assembly elements and keep them isolated.
If you define the BoM for the SHE100 shelf in the way shown by the table below, you will get two production orders on confirmation of a sales order, as also shown in the tables.
| Product Ref. | Quantity | Unit of Measure | Type of BoM |
|---|---|---|---|
| SHE100 | 1 | PCE | normal |
| SIDEPAN | 2 | PCE | normal |
| RPAN100 | 1 | PCE | phantom |
| PROFIL | 4 | PCE | phantom |
| RCK100 | 3 | PCE | phantom |
| Product Ref. | Quantity | Unit of Measure |
|---|---|---|
| SHE100 | 1 | PCE |
| SIDEPAN | 2 | PCE |
| WOOD002 | 0.25 | m |
| LIN40 | 1 | m |
| WOOD010 | 0.249 | m |
| METC000 | 12 | PCE |
| Product Ref. | Quantity | Unit of Measure |
|---|---|---|
| SIDEPAN | 2 | PCE |
| WOOD002 | 0.17 | m |
Bills of Materials for Kits/Sets
Note
Sales Bills of Materials
In other software, this is sometimes called a Sales Bill of Materials. In OpenERP, the term Kits/Sets is used, because the effect of the bill of materials is visible not only in sales, but also elsewhere, for example, in the intermediate manufactured products.
Kits/Sets bills of materials enable you to define assemblies that will be sold directly. These could also be used in deliveries and stock management rather than just sold separately. For example, if you deliver the shelf in pieces for self-assembly, set the SHE100 BoM to type Sets / Phantom.
When a salesperson creates an order for a SHE100 product, OpenERP automatically changes the SHE100 from a set of components into an identifiable package for sending to a customer. Then it asks the storesperson to pack 2 SIDEPAN, 1 RPAN100, 4 PROFIL, 3 RCK100. This is described as a SHE100, not just the individual products delivered.
Work Centers
Work centers represent units of production, capable of doing material transformation operations. You can distinguish two types of work centers: machines and human resources.
Note
Work Center
Work centers are units of production consisting of one or several people and/or machines that can be considered as a unit for the purpose of forecasting capacity and planning.
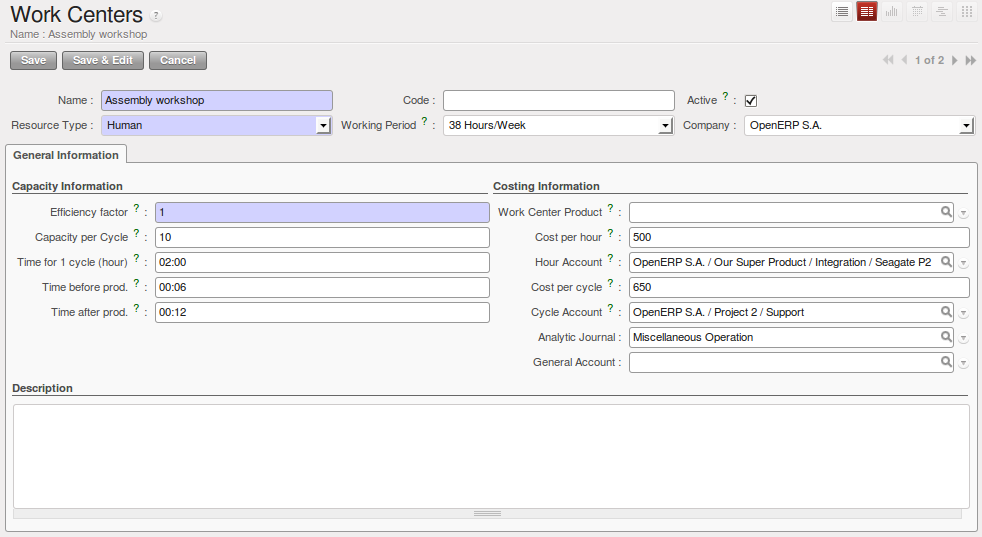
Use the menu Manufacturing ‣ Configuration ‣ Resources ‣ Work Centers to define a new work center. You get a form as shown in the figure Defining a Work Center.
Defining a Work Center
Tip
Missing fields
If some fields such as Analytic Journal, General Account in the view are missing, you have to add the user group Useability / Analytic Accounting.
A work center should have a name. You then assign a type: Machine or Human, a code and the operating hours, i.e. Working Period. The Working Time(s) can be defined through the menu Manufacturing ‣ Configuration ‣ Resources ‣ Working Time. The figure Defining a Work Center represents the hours from Monday to Friday, from 08:00 to 18:00 with a break of an hour from 12:00.
You can also add a description of the work center and its operations.
Once the work center is defined, you should enter data about its production capacity. Depending on whether you have a machine or a person, a work center will be defined in cycles or hours. If it represents a set of machines and people you can use cycles and hours at the same time.
Note
A Cycle
A cycle corresponds to the time required to carry out an assembly operation. The user is free to determine which is the reference operation for a given work center. It should be represented by the cost and elapsed manufacturing time.
For example, for a printing work center, a cycle might be the printing of 1 page or of 1000 pages depending on the printer.
To define the capacity properly, it is necessary to know, for each work center, what will be the reference operation which determines the cycle. You can then define the data relative to the capacity.
Capacity per Cycle (CA): the number of operations that can be done in parallel during a cycle. Generally, the number defines the number of identical machines or people defined by the work center.
Time for 1 cycle (hour) (TC): the duration in hours for one cycle or the operations defined by a cycle.
Time before production (TS): the time in hours required to initialize production operations. Generally, this represents the machine setup time.
Time after production (TN): the delay in hours after the end of a production operation. Generally, this represents the cleaning time necessary after an operation.
Efficiency factor (ET): the factor that is applied to the TC, TS and TN times to determine the real production time. This factor enables you to readjust the different times progressively and as a measure of machine utilization. You cannot re-adjust the other times, because generally they are taken from the machine’s data sheet. By default, the efficiency is set to 1, representing a load of 100%. When you set the efficiency to 2 (i.e. 200%), the load will be 50%.
The total time for carrying out X operations is then given by the following formula:
((X / CA) * TC + TS + TN ) * ET
In this formula the result of the division is rounded upwards. Then, if the capacity per cycle is 6, it takes 3 cycles to realize 15 operations (15/6 = 2.5, rounded upwards = 3).
With the Hour Account and Cycle Account you define the links to analytical accounting, to report the costs of the work center operations. If you leave the different fields empty, it will not have any effect on the analytic accounts.
Routings
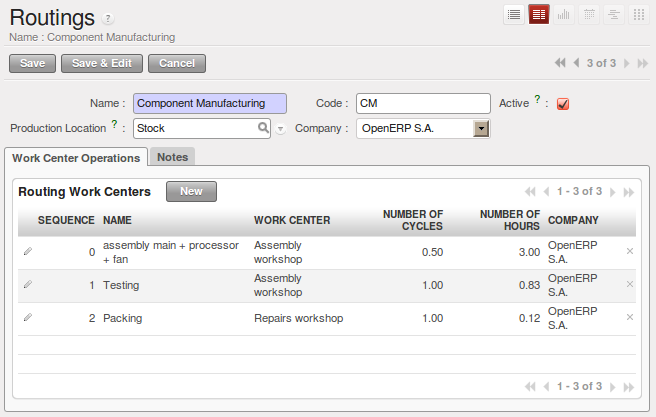
Routings define the manufacturing operations to be done in work centers to produce a certain product. A routing is usually attached to bills of materials, which will define the assembly of products required for manufacturing or to produce finished products.
A routing can be defined directly in a bill of materials or through the menu Manufacturing ‣ Configuration ‣ Master Bill of Materials ‣ Routings. A routing has a name, and a code. You can also add a description. Later in this chapter you will see that a routing can also be associated with a stock location. This enables you to indicate where an assembly takes place.
Defining a routing with Three Operations
Note
Subcontracting Assembly
You will see further on in this chapter that you can also link a routing to a stock location for the customer or the supplier. You can use this functionality when you have subcontracted the assembly of a product to a supplier, for instance.
In the routing, you have to enter the list of operations that has to be executed. Each operation has to be done at a specific work center and includes a number of hours and/or cycles.
Tip
Multi-level Routing
It is possible to define routing on several levels to support multi-level bills of materials. You can select the routing on each level of a bill of materials ( BoM in a BoM can have a different routing). The levels are then linked to hierarchies of bills of materials.